
Interface and stock exchange
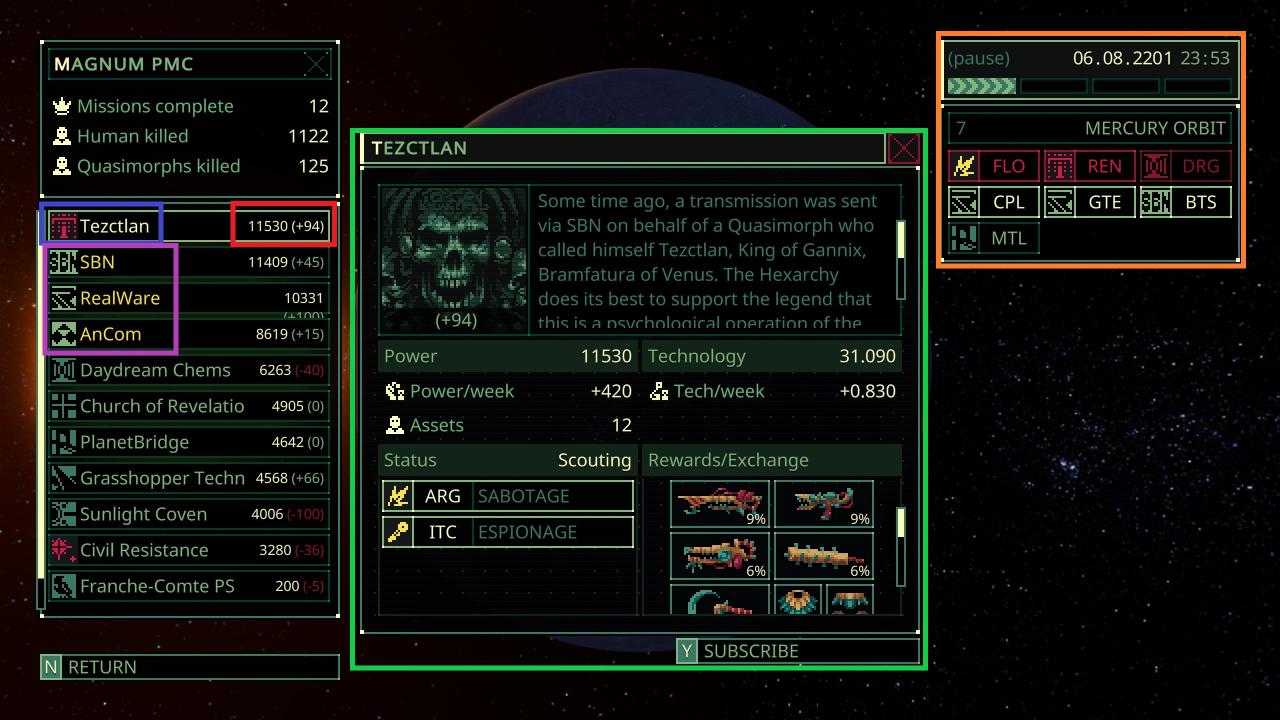
On the left is the exchange. Here you can see the different factions in the game and go to their main screens (highlighted in green).
For convenience, each part is highlighted with a colored frame..
Blue: faction name and icon.
Red: faction power level and reputation:
- Bigger number - this is the level of strength, the strength of enemies depends on it, that you will encounter when completing missions against this faction.
- Smaller number - this is your reputation in the faction. The higher your reputation (maximum +100), the better items you can get when trading for them (this is also influenced by the technical level, which we'll talk about later).
- A negative reputation with a faction will prevent you from visiting its stations and trading with it. It's best to avoid acting against factions, with whom you are interested in trading.
Purple: major human factions:
- You should focus on these main factions for reputation and trade. They provide some of the best exchange options: large backpacks, powerful equipment and metaprogress chips. It's best to choose missions, which will help them improve their technical level. However, in the current state of the game, profitable trade routes may be available between some other factions. You can help or hinder any faction you choose.
Green: faction information screen:
- There will be an image of the faction at the top and your reputation with it at the bottom.
- To the right of the faction image there is information about the faction. This is great and worth a read..
- The "Strength" section displays the faction's weekly strength gains along with its assets. Assets are controlled stations, which affect the weekly increase in power and technology.
- The technology section shows the technical level of the faction and the increase in technology per week. The technical level determines the level of available equipment. The higher the level, the more powerful items you can get as a result of exchange.
- The "Status" section displays the faction's current strategy, which affects the types of missions available to her. They will change as, how factions will dynamically act against each other; your participation in the mission also affects this. The currently available faction missions are also listed here.
- Items are displayed in the "Rewards/Exchange" section, which can be obtained by completing missions or exchanging with a faction. The numbers on each item indicate the weight of receiving it.. Variants, grayed out, unavailable due to low reputation.
Orange: planet information screen:
- The date and time are indicated at the top. Each bar represents the speed of the game and can be used to speed up the time it takes to create or wait for new missions to appear.
- The number of stations and the name of the planet are indicated below the timer.
- Each station is represented by a three-letter abbreviation and an icon of the station owner. Yellow station icons mean, that there is a mission there, and different icons indicate different types of missions. Red stations usually mean, that you can't land there because of the reputation. but Tezctlan and Civil resistance always seem red, even if you have a positive reputation with them and can land.
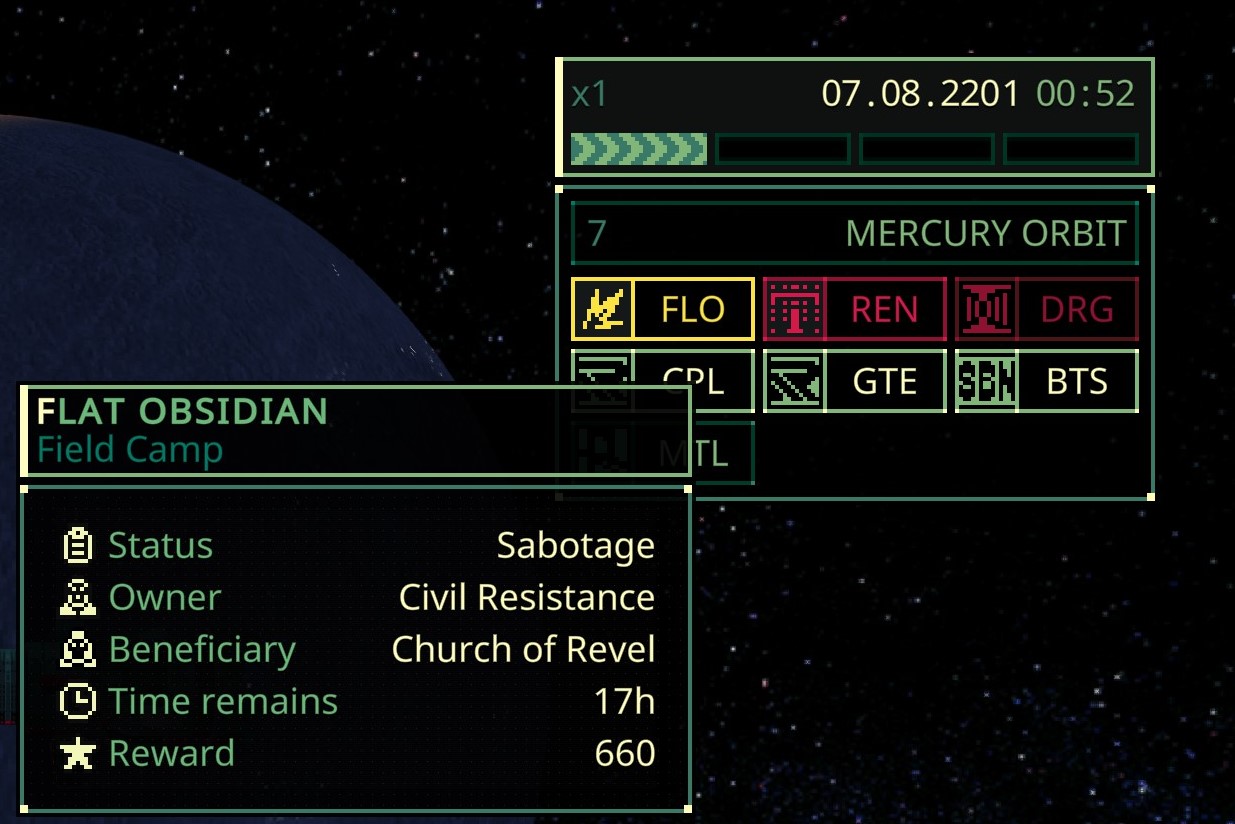
Mission Information
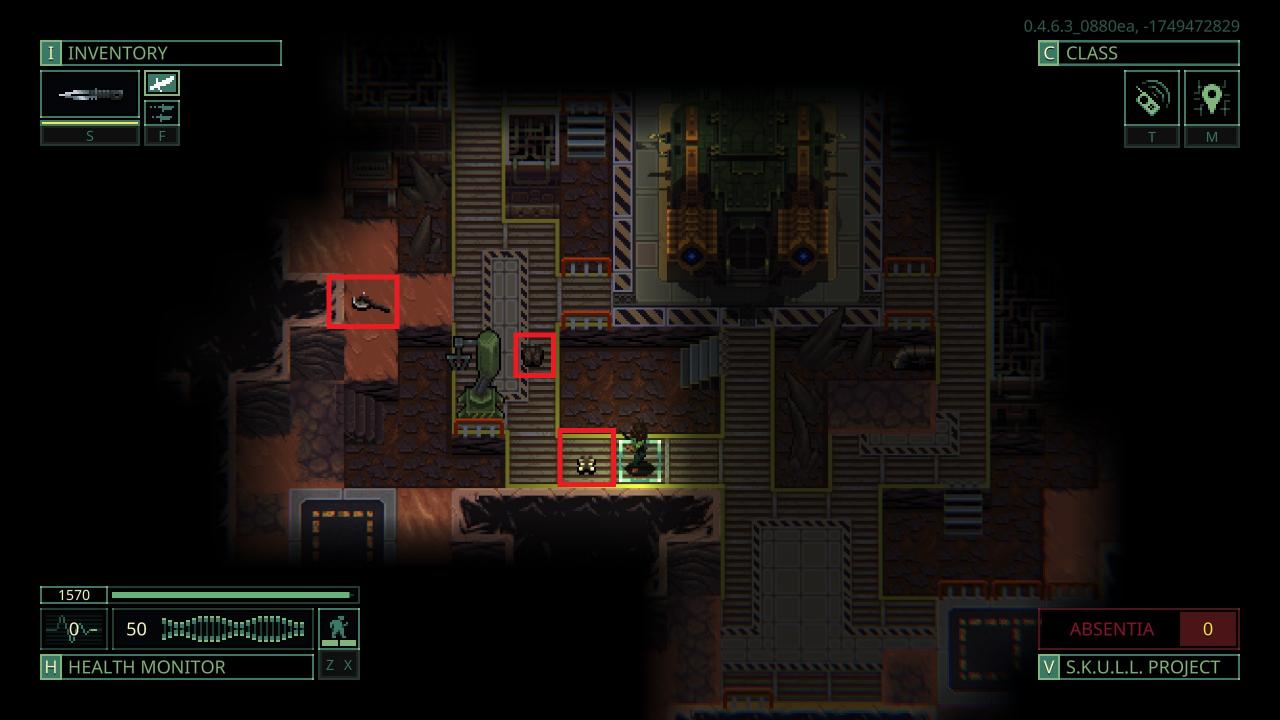
- Sabotage
- Find and destroy multiple targets. These targets are always located on the top floor of the station, and to destroy them you need to inflict several damages. On the top floor they will be marked on the map with a yellow cross. A warning: use ranged weapons, since targets tend to explode.
- Espionage
- Find and deliver the item. The item is always on the top floor and takes up space in the inventory. It will be marked with a yellow cross on the map.
- Conquest
- Drive through the station, by killing a certain number of enemies on each floor. Number, which you need to kill, makes up half of the total number of floors. To check your status, you can press the evacuation button (switch in the upper right corner), and it will display a list of enemies, remaining on each floor visited.
- These tasks are good because, that the number of floors is known, since it is always indicated when pressing the evacuation button.
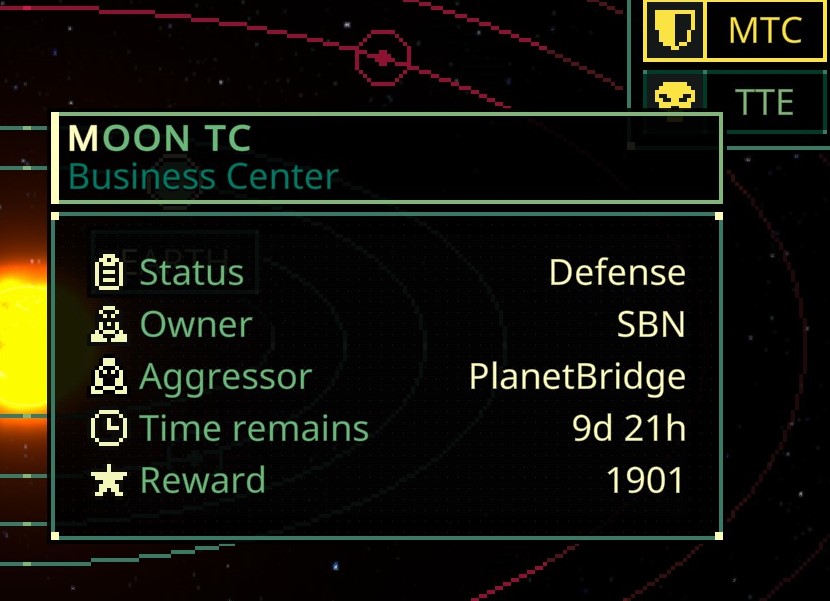
- Protection
- You will fight for survival in a small arena for 150 moves.
- As soon as the move counter is reset to zero, enemies will no longer appear, and you will have to kill the survivors, to get out.
- When you hover over available tasks, information about it will be displayed.;
- Job Information:
- Station owner
- This determines, what enemies you might encounter and their equipment. This information can be gleaned from the faction's strength level and technology level.. Strength affects the number of enemies, and technology influences equipment.
- Attacking a faction station harms your reputation among them, so choose wisely.
- In "Defense" type missions you help the station owner in the fight against the aggressor, therefore, the gain/loss of reputation changes places along with the enemies encountered.
- Beneficiary
- Fraction, hosting the mission.
- This is a faction, whom you help, and she will reward you for completing the mission.
- Aggressor
- During defensive missions, it is this faction that carries out the attack. The enemy/equipment pool will depend on the strength and technology level of that faction.
- Time left
- How much time is left before, when the mission expires and the station becomes available for trade again.
- Reward
- The number here determines the value of the reward. A higher number means a higher chance of dropping a valuable reward for that faction. The list of rewards can be found on the faction information screen on the exchange.
Preparing for the task and choosing a character
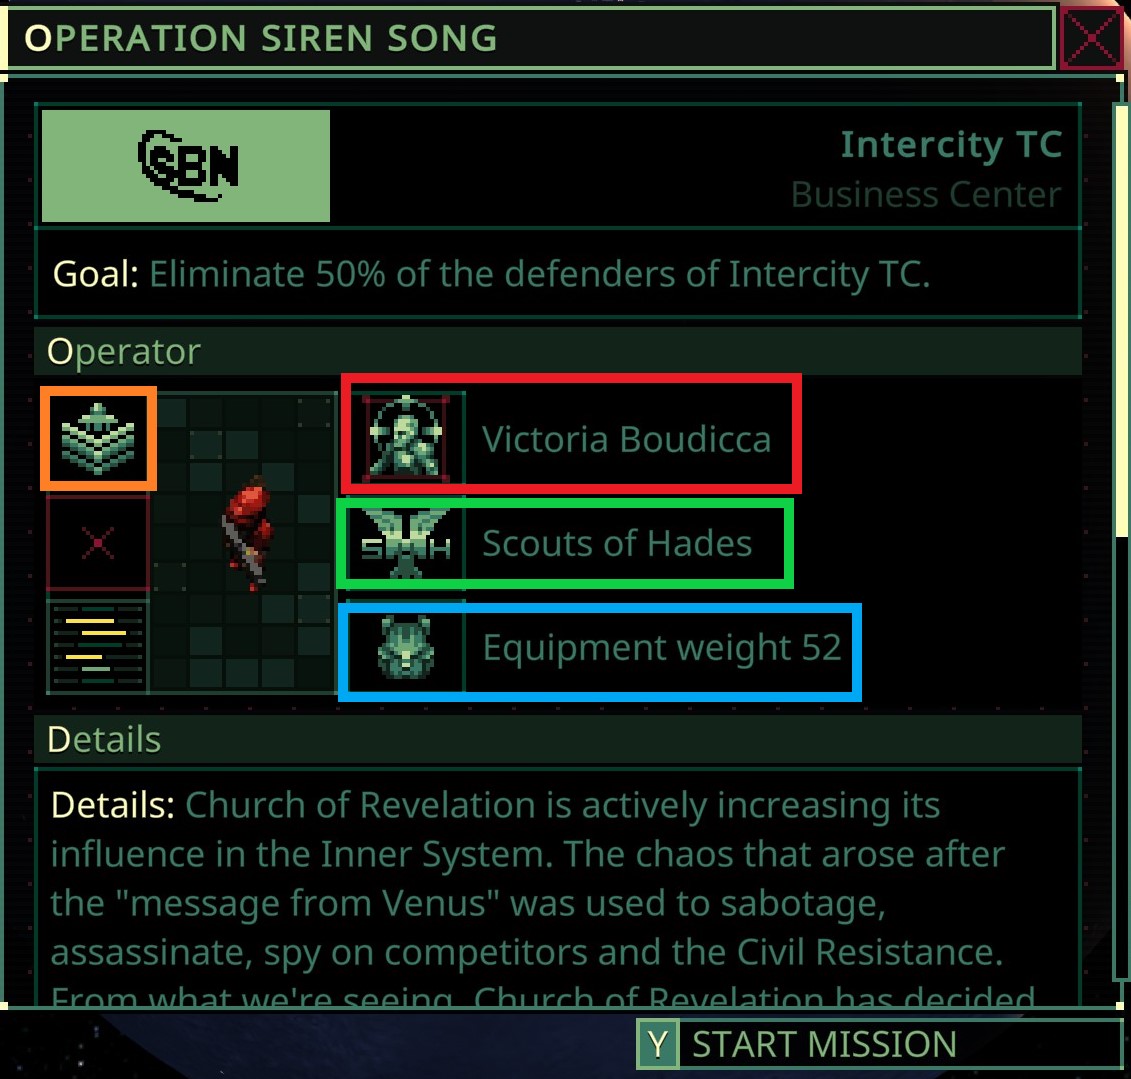
- Orange: character insignia.
- This is based on completed missions and, seem to be, doesn't do anything at the moment.
- Red: branch
- This is a clone, selected for mission.
- You can only have one clone of each gene type at a time.
- Clone defines base stats and special trait (cm. below).
- Green: Class
- The class of the selected clone can be seen and changed here.
- Changing clone classes resets skill levels and experience progress.
- Blue: equipment
- Pressing this button allows you to change equipment, which you will take with you on your mission.
- Equipment weight affects evasion probability and calorie consumption. More weight = less dodging + you'll get hungry faster.
Clone information
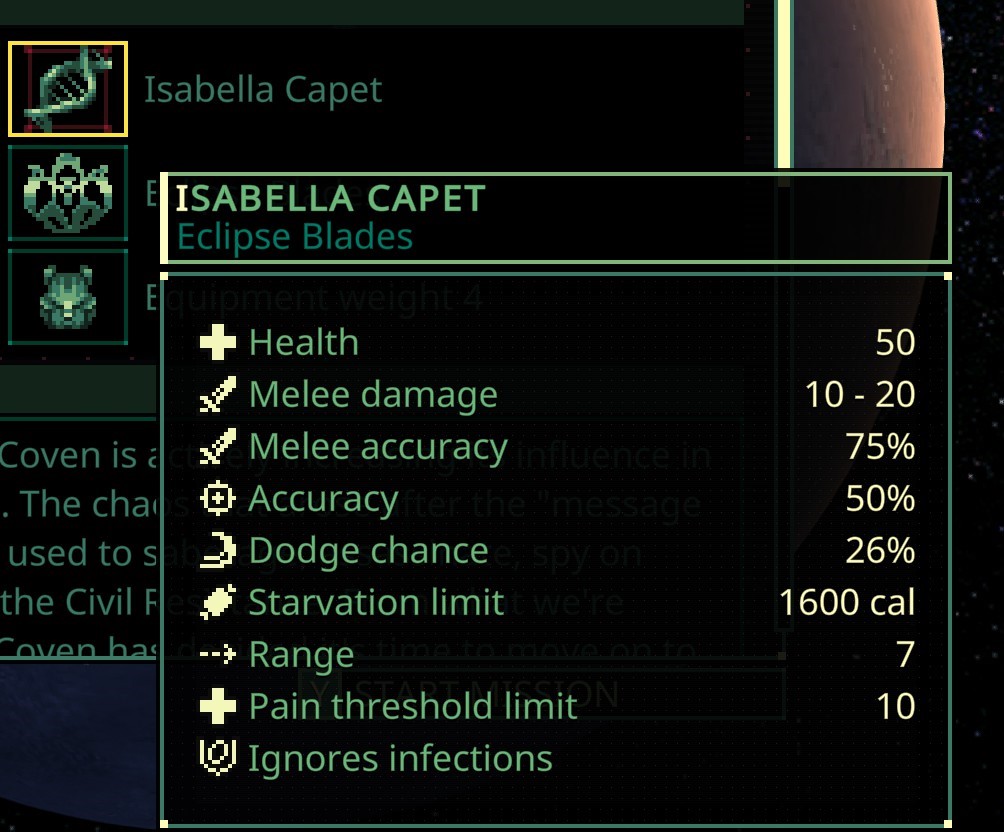
Health
- Initial Clone Health.
- Some classes can increase maximum health, and some items can do this temporarily, but that's all, what do you have to work with.
Melee Damage
- This damage is added to melee weapons.
- You don't need to do any math calculations, weapon, which you pick up in missions, will already have this meaning, added to weapon information.
Melee Accuracy
- This is your base chance to hit with a melee weapon..
- Certain melee weapons and attack types increase or decrease this value.
Accuracy
- This is your base chance to hit with ranged weapons..
- The weapon and selected fire mode may change this value.
Chance to dodge
- Your chance to avoid attacks.
- Currently, Considering that, how equipment weight works, it's practically pointless. A full backpack will almost always result in a negative dodge value.
Fasting limit
- Starting calories, which you will have when entering the mission, and maximum stock, which you may have in stock.
- If you eat beyond your limits, food is wasted.
View range
- Player View Distance.
- This can be changed by lighting some levels. You won't be able to see far in the dark even with a wide range of vision.
- This statistic is extremely useful.. Clone Mirza Aishatu has a base range 9, which allows you to see enemies before, How will they get within shooting range?.
Pain threshold limit
- How High Can Your Pain Meter Go?, before the character is stunned and disconnected
- Pain causes various debuffs, this also applies to enemies.
I draw the branch
- Each clone has a unique trait, which may affect, what style do you want to complete the tasks in?.
Tips for starting the game
- For your first clone, I recommend playing as Isabella Capet. Her ability to avoid infection will be useful for Mars farming missions, Phobos and Deimos.
- The main reason, why Isabella Capet is the best option, is that, that meat and flesh, in fact, are free types of food, which usually have a downside: probability of infection. Ignoring the infection, you can eat meat and farm a map for rent without the risk of starvation.
- I also recommend playing Isabella as Blades of Eclipse, class, melee oriented. As the game progresses, hand-to-hand combat becomes difficult, but at the beginning of the game it is very easy to kill most of the enemies, allowing them to approach you and attack. Doorways here are your friends. It is important to note, that even when playing as the Blades of Eclipse, you will need a ranged weapon, to deal with the biggest threats on Mars and its moons - Flamethrowers and Cutters.

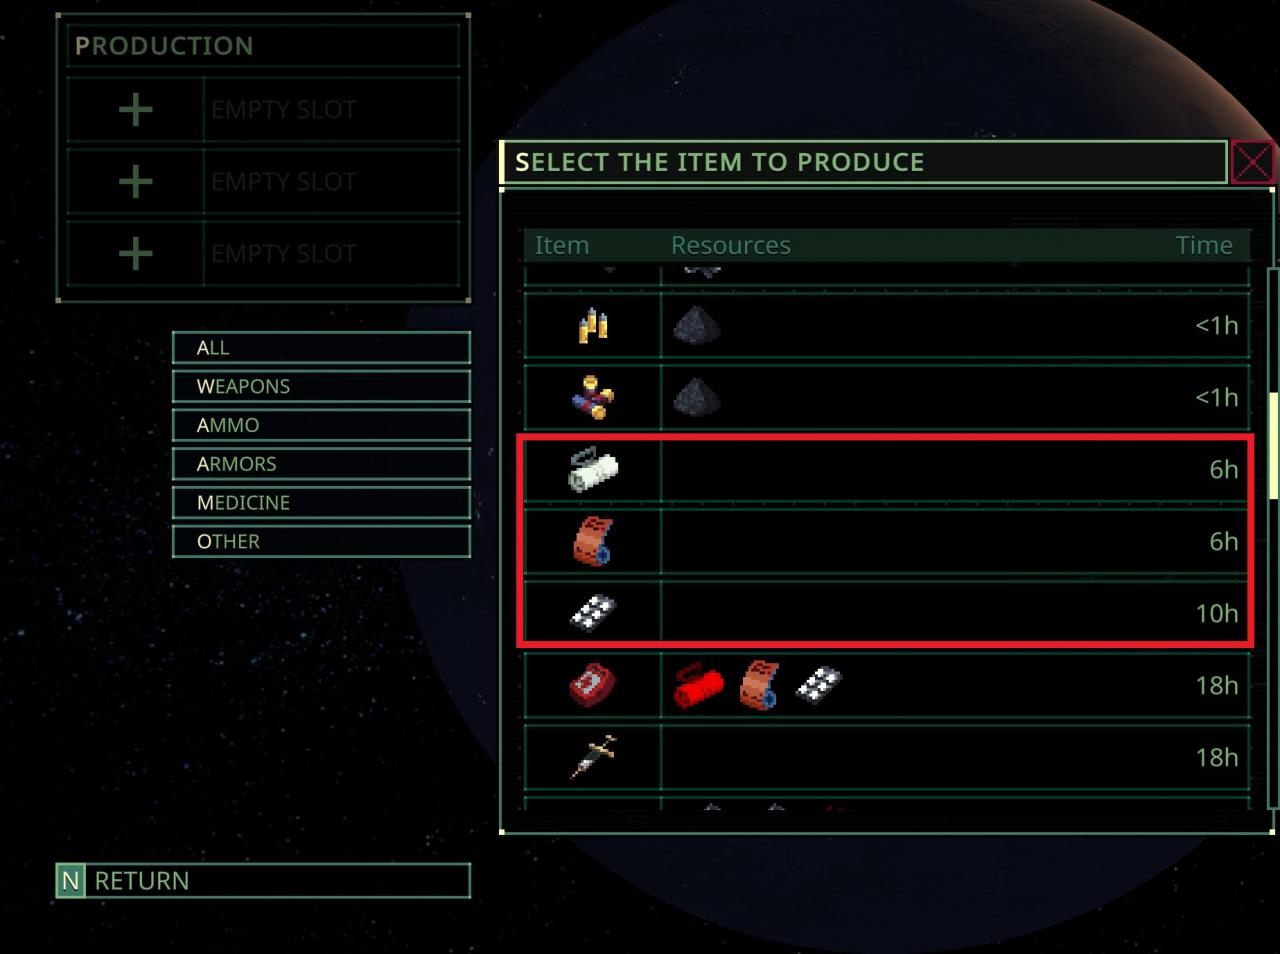
2. Then put some healing items in your ship's production queue.
- It can be accessed, by pressing I or the spaceship button.
- I recommend making bandages, tires and a little bit of antibiotics. You can skip taking antibiotics, if you plan to play as Isabella.
3. Fly to Mars or its moons. Mars, Phobos and Deimos do not have a Quasimorph timer for plot reasons. It means, that space demons will not spawn from enemies and there will be no increase in the counter when moving around the map. This greatly simplifies missions and gives you the opportunity to capture everything, what is possible, without fear, that space demons will kill you.
- Eating raw meat and flesh will usually increase the Quasimorph's timer, but, because there is no timer in these missions, this gives an additional reason to use Isabella Capet as the starting clone.
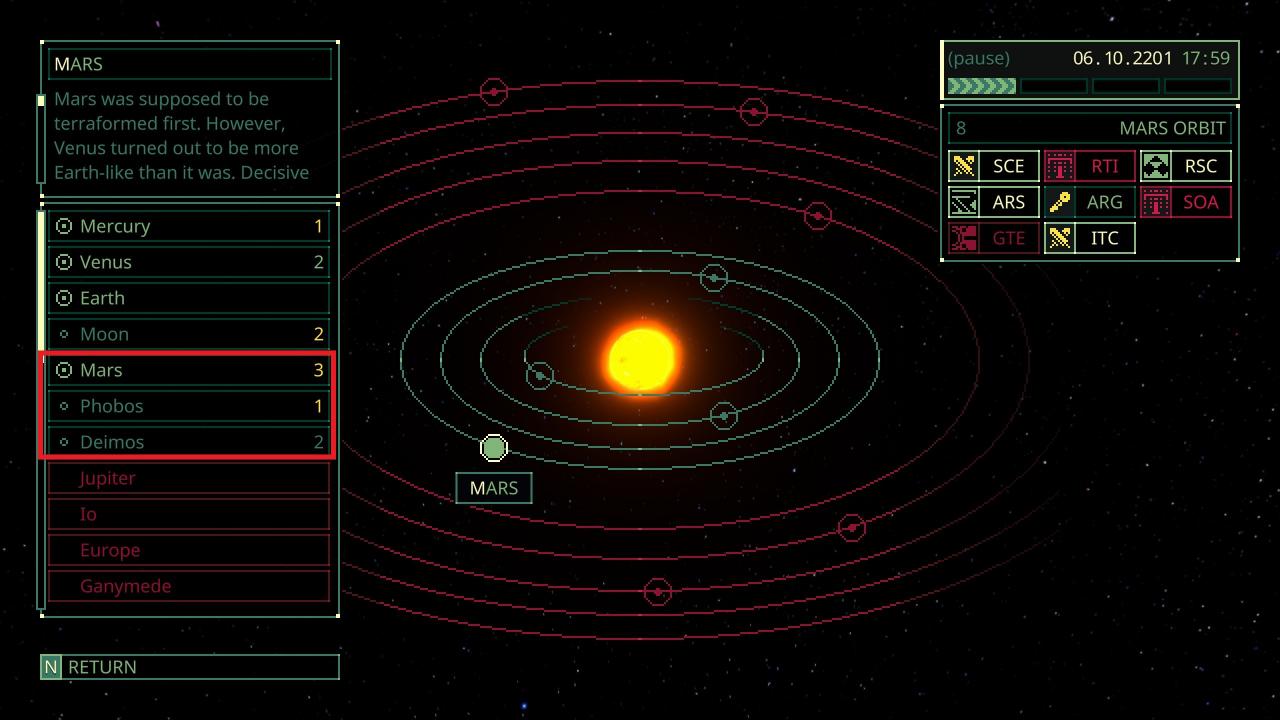
4. Choose any mission on Mars or satellites. Avoid defensive missions at the beginning, they don't offer much loot and are more about reputation building.
- I recommend avoiding missions against SBN, RealWare and AnCom, as these factions can offer the most interesting items for trade. Moreover, I would avoid missions against Tezctlan, since they, usually, expose more dangerous enemies for the initial clones.
- Bring starting equipment and medications with you. If you are not playing as Isabella Capet, you will also need food and antibiotics.
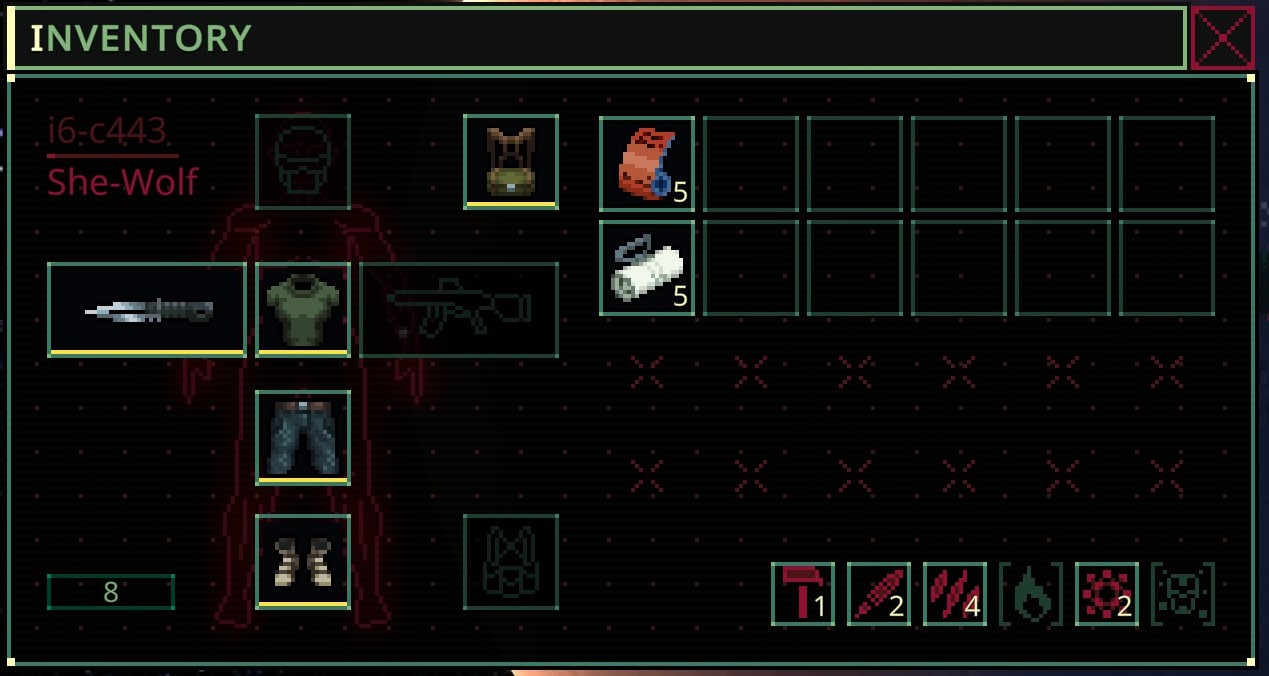 Usually on the first mission I only take a knife and some medicine with me. You can take your gun with you, but you'll almost certainly find it soon enough.
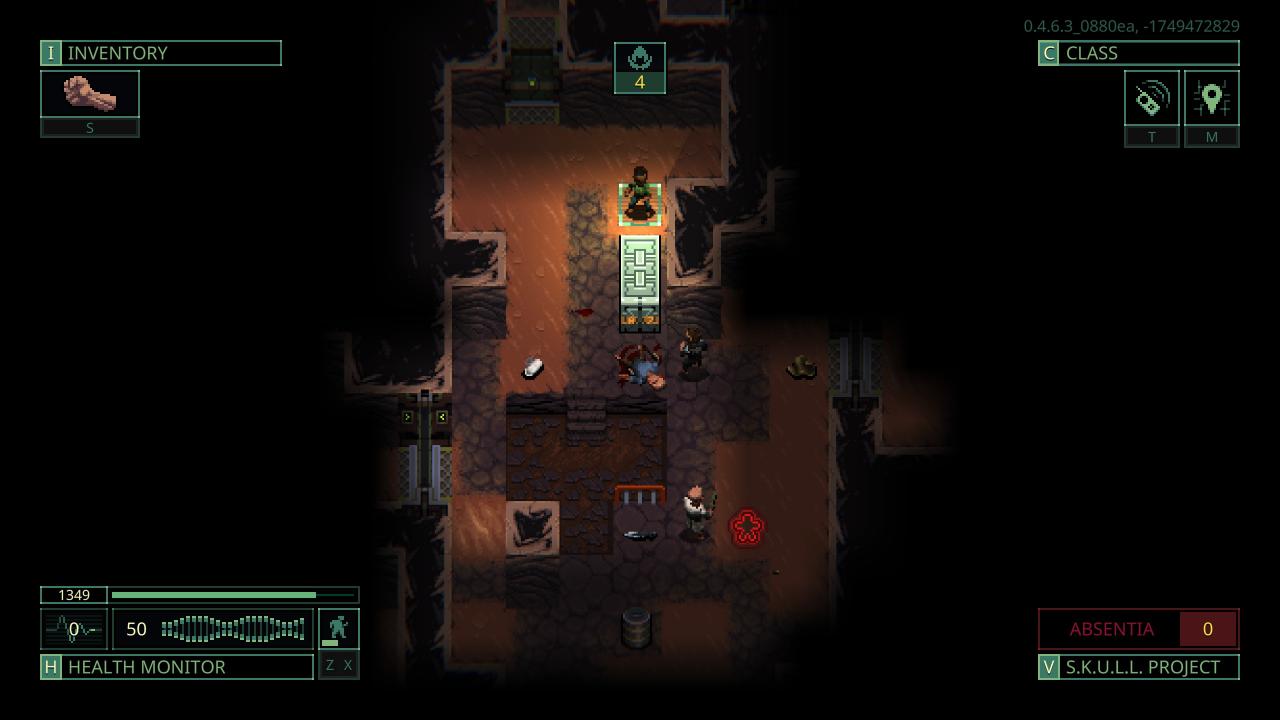
5. Let the carnage begin
You will appear near your ship, and there will usually be some loot around.
Move along the floor, until you find enemies. Doors and shelters that block visibility will become your best friends.
After killing the first enemies, search them, clothes can be disassembled into rags, which can be used as cheap and fast medicines.
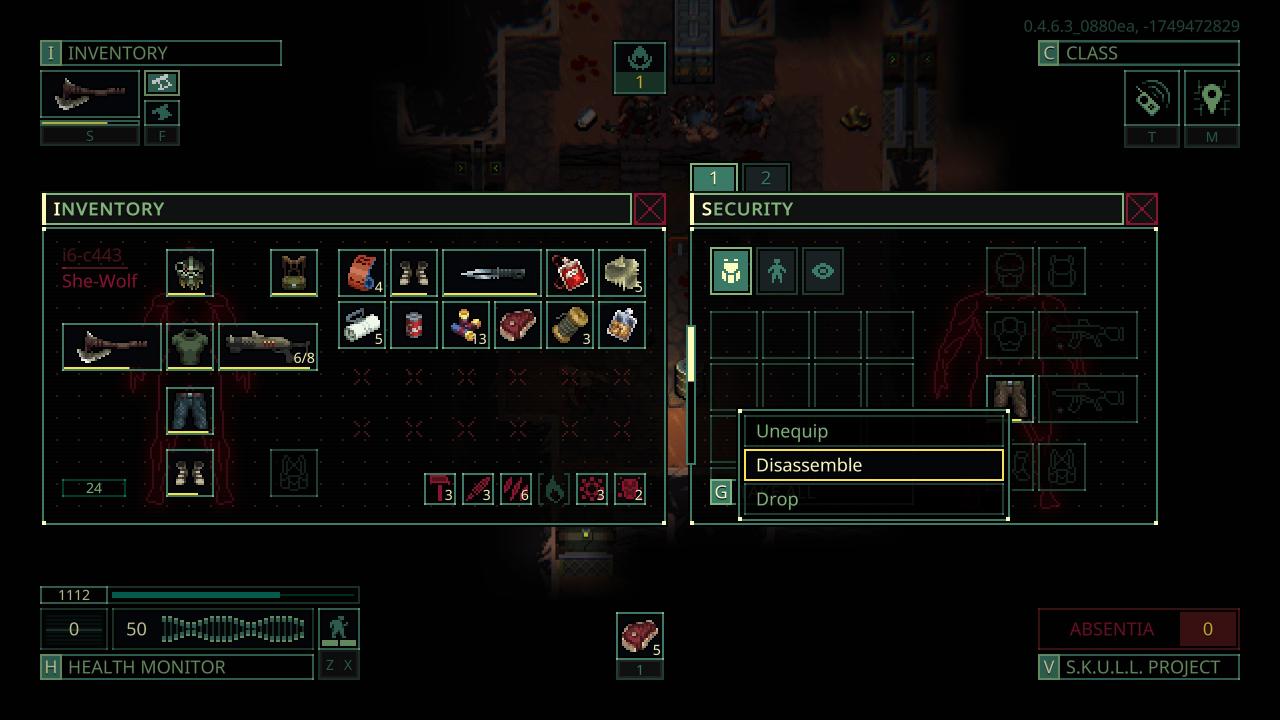
Any clone can extract meat from a corpse, but consuming it raw carries a risk of infection, and also harmful to health, playing as Isabella Capet you don't have to worry about infection. You can get meat, opening a window with information about the enemy's body, and clicking on body parts, to amputate them. For clones, more concerned about infection, you can process the collected meat into canned food, which will be processed.
 Interesting loot, also obtained by amputation, are the eyes, which can be obtained from heads, since at some stations they are a good item of exchange.
6. 'Brother,It hit me!’
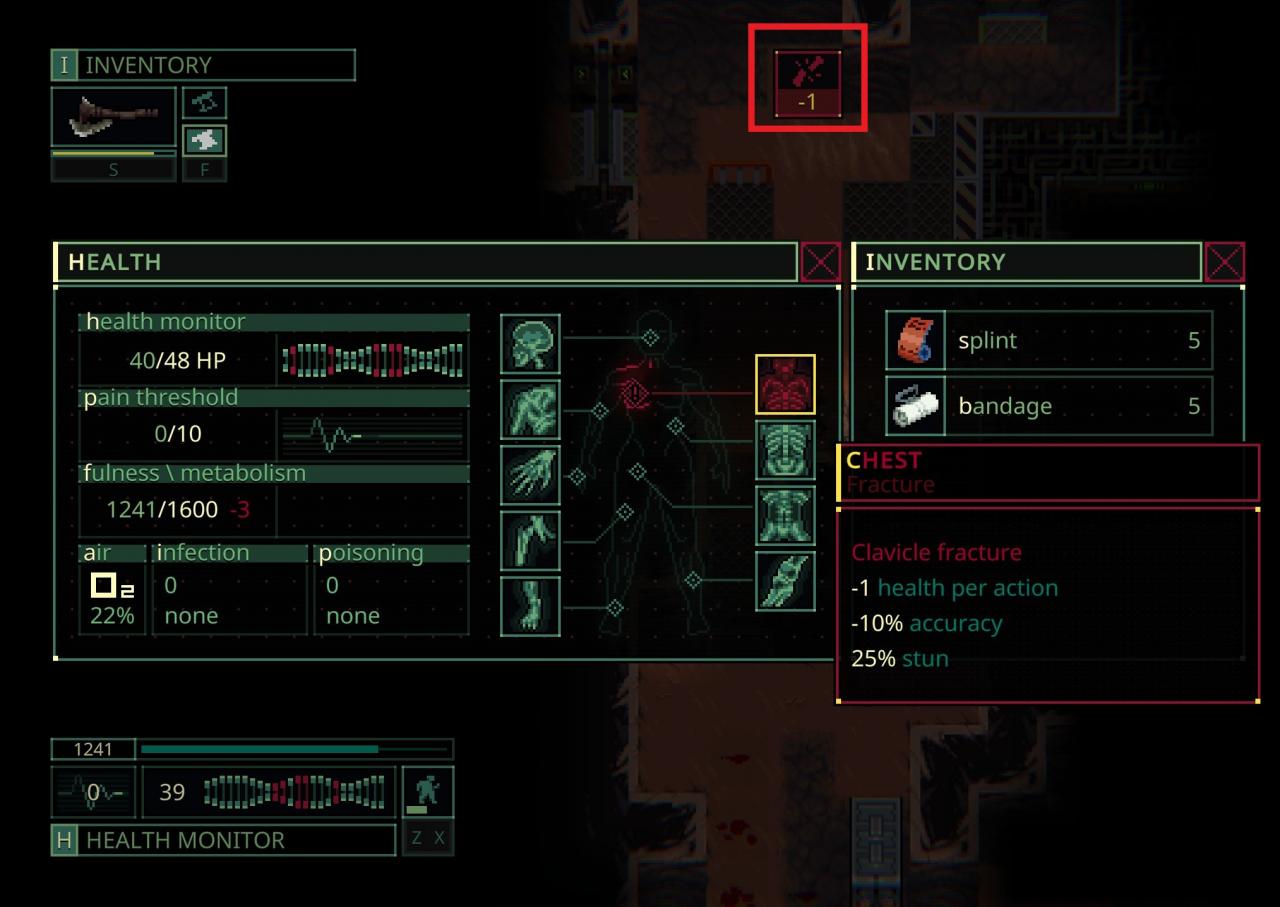
At the top of the screen you can see your injuries in red.
To heal myself, press h, select the healing item on the right and apply it to your injury. Bandages are better for puncture wounds and burns, and tires - in case of fractures.
Sometimes multiple uses of an item are required, so be careful on your next moves.
7. Types of movement
The game has three movement speeds:

- Steal
- You only get one action point per turn
- You move quietly and can observe the enemy's movements. You can even kill enemies without being noticed, dollars will turn into collection runs due to. (No one sleeps on Mars and its moons, but it works on other planets)
- Consumes the fewest calories per turn.
- Using Inventory Items, opening doors and other interaction actions do not require action points.
- Walking
- This is the standard way to fight and move, if you don't want to sneak.
- You get two actions per turn.
- Moderate calorie consumption per move.
- Sprint
- You get three actions per turn.
- You lose precision while sprinting(The Blades of Eclipse class has a perk that increases accuracy during sprinting), so be careful.
- High calorie intake and sprinting too often will lead to, that you will quickly die of hunger.
8. General Tips
- Don't open doors or go through them as your last action.!
- Dismantling equipment and cutting up bodies can give you useful material for completing the task, and also for trade.
- During the game you will find metaprogression flash drives. They let you evacuate, not completing the mission. I recommend filling your inventory safely, if you can, and leave with them. Recipes, clones and classes, which they open, extremely helpful.
- You can easily pass the time in the Mars area, flying to the moons and back, and don't just wait. Any option is suitable depending on your goals.
- Before leaving the relative safety of Mars, you should stock up on equipment for several clones and upgrade them. Moreover, presence of some items, reducing quasimorphism, such as alcohol and cigarettes, will make missions with a timer much easier.
- Enemies have resistances and armor, like you. You can check the enemy's stats and equipment, by right clicking it. Robots, eg, very resistant to punctures, blunt objects and fire, but they fall quickly, to cut yourself, so use machetes and shotguns!
- Explosive barrels can be defused, by clicking on them with the left mouse button and taking out gasoline.
- The biggest danger on Mars comes from enemies with cutters and flamethrowers. Destroy them from a distance as quickly as possible. If this is not possible, run through the door and find cover.
From cakey
Leave a Reply