
This is a collection that tells about most of the game mechanics before the capture of Khiva.. To the description of the mechanics, I attach tips for a beginner.
The manual does not claim to be as accurate as possible, there may be mistakes or bad advice. If any information is not accurate – she is marked with a question mark (?). The manual will be further refined if accurate information is found., I am especially interested in formulas and exact values that are not written in the game itself. If there is a good guide on any topic – I will attach links to save space. Screenshots are sorely lacking, I will add little by little.
I recommend using the table of contents to watch only interesting topics, great leadership because I'm not a very good writer. The subsections are a little bloated with details.
This guide can be roughly divided into three sections:
- Strategic map
- Combat tactics
- Ships
The most, in my opinion, main part – strategic map. The game forgives many mistakes in tactical combat, and it is simply clearer for a beginner, and you can basically not engage in the design of ships and still have every chance of winning. So it is from the strategic level that we will start.
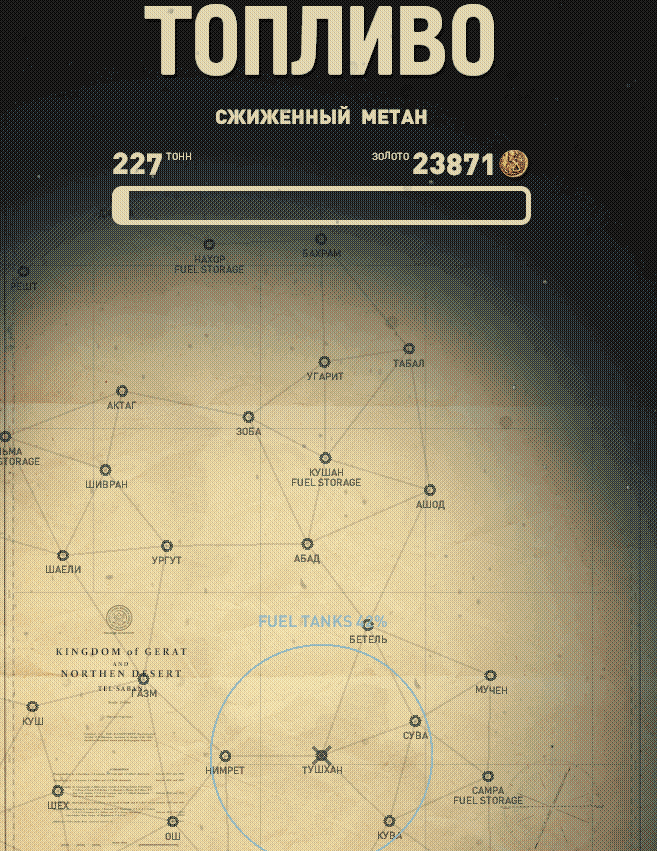
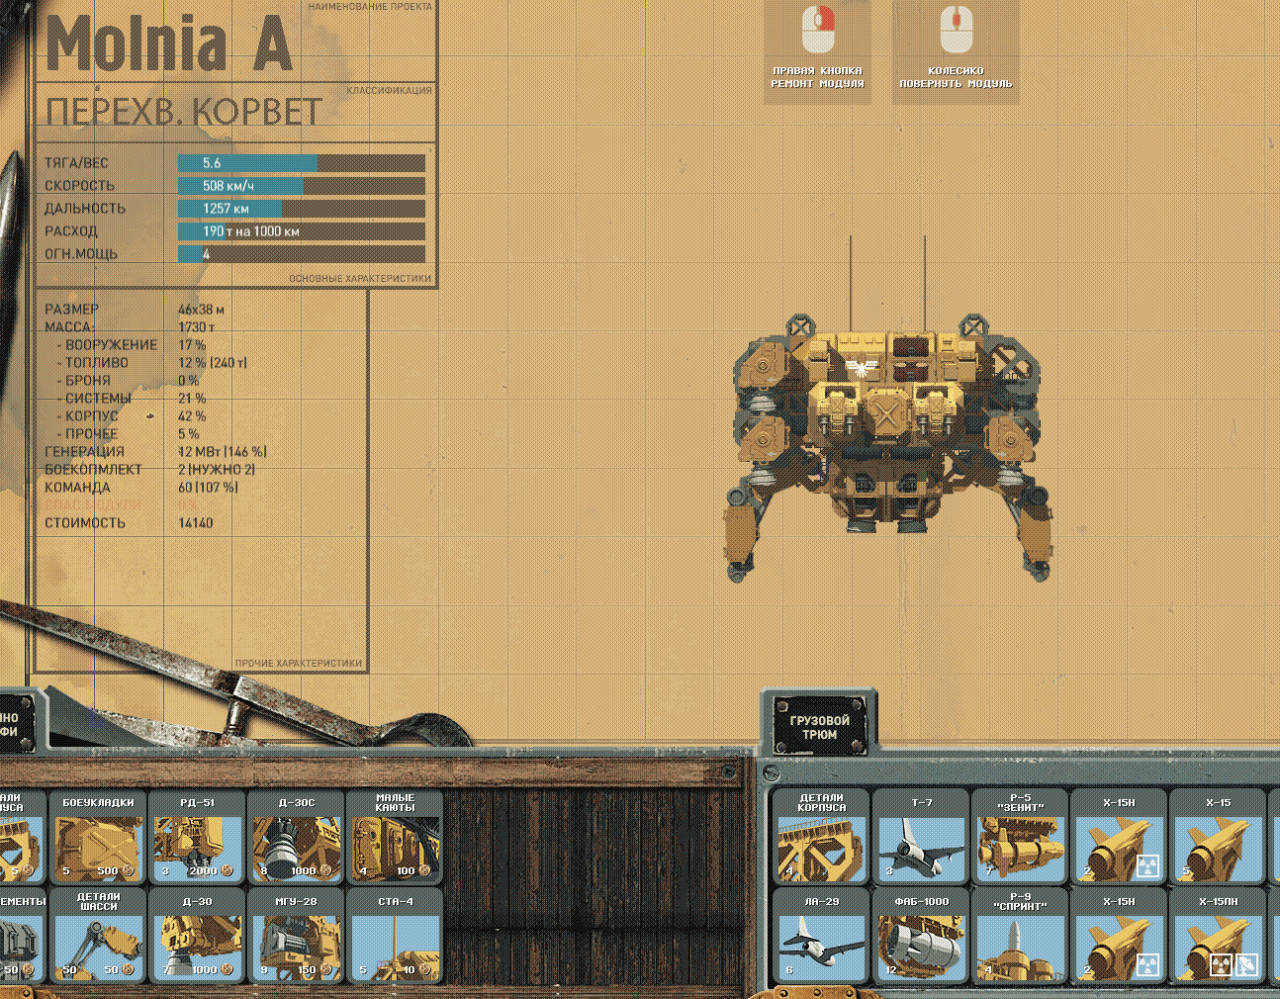
Fuel is displayed in two places at once and in different ways. On the strategic map screen, we have percentage fuel meter this part of the fleet – how much fuel in relation to the maximum capacity of the tanks you have. You cannot take more fuel than will fit into the tanks.
The maximum flight range is indicated flight range scale – how long will the entire fleet fly (at the speed of the slowest ship). Blue stripe – how many km will it be enough if you take off right now, yolk – how long will it last if you wait until all the fuel is filled.

Two flashing indicators blink if fuel is being poured right now or it is dangerously low. When it dries up – you get stuck.
Second counter – this is the sales window in cities. There the fuel is indicated in tons – above the tank fullness scale. It can be sold as (by reducing the percentage of fuel in the tanks) so buy. If you bought fuel – will have to wait until it is flooded, but it is sold instantly. However, if you need to fly away – what you bought will not be lost and later you can come back and pick it up.
The map next to the meter shows the nearby area, and the blue circle – marks the territory as on the global map, within which you can fly away.
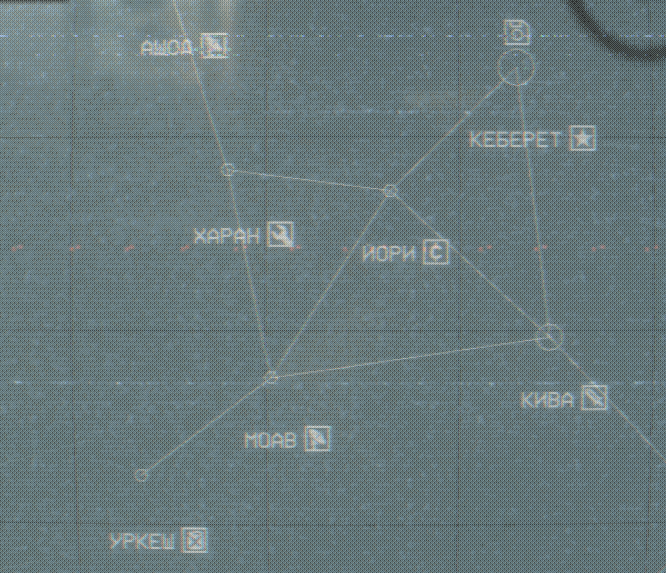
A very important element of the game – this is the division of the fleet into groups. This division is done by selecting ships on the fleet panel and pressing left by clicking on the specified target. When a group selects a target, two white circles appear on the map, one inside the other.
More – this is an analogue of the blue circle – the maximum distance the group will fly away.
Less – this is half of this range – also takes into account the cost of fuel to return to the starting point.

Smaller circle radius 270 km – maximum range including return
All groups have full fleet functionality. They can attack enemies, occupy cities, it seems, buy parts, use radars, rockets, aviation, intercept messages and so on. This means that you do not need to drag all the ships to a new city every time. – a small strike team can handle it, while your fleet will be engaged in repairs, dressing, rest – or just stand somewhere in the wilderness, saving fuel.
In the same way, already captured cities can be visited with minimal fuel consumption. – because there is no garrison, which means you can send the cheapest ship in terms of fuel for purchases or intelligence.
When starting a group, you can change the amount of fuel that will be allocated to it. By default, so much fuel is released, how much will not affect the flight range of the main group (ROVN button). You can fill the group with full tanks FULL button or adjust exactly the percentage of transferred fuel using the wheel. This is important if the group cannot reach the desired location., and the flight range of the main fleet is not important to you (he is at a gas station or will fly in anyway).
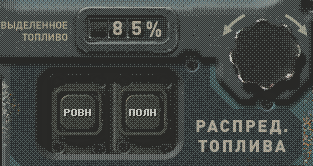
Control of the fuel that will go to the group
Advice:
- Don't drag heavy ships to every city along the way. Use small tankers to create autonomous groups that will visit cities of interest that lie to the side of the road.
- Try to navigate the main fleet through fuel storage to save money, but remember that a big deviation from the straight path will eat up all the difference in money.
The main way to make money – extraction of trophies from destroyed enemies and sale of captured transport ships. You can sell trophies in the repair window, the captured ship is sold automatically. You can also disassemble your own ships for the sake of money. – removing equipment from them and selling. More money is given to you by joining allies. Later, some money can be begged from them at the expense of reputation..
Money is spent in cities – are drawn as points on the map connected by lines. Each city offers several basic services and specializes in some additional service.
Basic services – available in all cities:
- Repairs. More details are described in the part about repair.
- Fuel purchase. Read more in the section about fuel.
- Buying ammunition. Read more in the tactical battles section.
Specializations – each city specializes in one thing:
- Shipyard – repairs are carried out much faster, many parts on sale, but not weapons. (wrench)
- Fuel storage – fuel is cheaper. Paving the way for the main fleet through these cities – profitable, but don't deviate too much for the sake of fuel storage. (canister)
- Rare parts market – very large assortment. Basically, this is the only place where you can find weapons., aviation, radars and missiles. It is advisable to visit to accumulate a stock of consumables. (With dashes)
- Mercenary Market. Allows you to recruit additional ships from several random. If you don't like the ship you bought – you can drag it to the shipyard and rebuild it into another, and sell the remaining parts. (sword)
- Tropospheric communication station. Accumulates up to 5 charges, for which you can reveal the location of random opponents. The location of the enemy strike group costs 3, torpedo group – 2, convoy – 1. Charges are replenished, after a while, you can visit the city and start the disclosure again. The most important information – not just location, and the callsigns, which will allow for radio interception to guess who exactly and where is. If the enemy moves somewhere – his path will be shown immediately. (plate)
- Military base – saves your progress when capturing and fires a number of nuclear missiles of all types. Rockets can be sold if there is little money or saved. Military base security is usually stronger than that of cities. (star)
All kinds of cities
Caution! The use of nuclear weapons in the city can destroy it, and landing in it will be complicated by radiation.
You can only stay in the city with impunity for a limited time – about a day. After that, there is a risk that your location will be reported to enemy strike groups. In about another day, this risk will become maximum.. The accumulation of this counter is permanent – the danger warning that appears once will not disappear. On the map, dangerous cities are indicated by a yellow / red inscription DANGEROUS.
Despite the fact that the game has a typical rogue-like autosave system (after the battle – when leaving) – you can also record the game several times by capturing military bases. Unlike autosave, you can load such a save at any time., at the same time, you have access to all the previously made for this attempt to save. Thus, in case of inconvenience of past saving – roll back to the last.
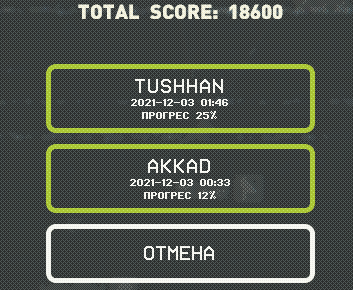
The loading menu shows as a percentage how much way to Khiva has already been covered
Advice:
- When forming the starting fleet – leave money for operating expenses. It is optimal to leave about 40-50 thousand, this will make it possible to purchase all the necessary consumables.
- If you do not need the services of the city and you just want to wait it out – it's better to fly out of it and sit in the desert. You will not spend a lot of fuel (sitting in the desert it is not wasted), and the city will not become dangerous.
- There are hidden cities in the game, they can be searched for by radar in terrestrial scanning mode or simply visually – tucking the camera close to the fleet. Well, or ask the nomads during a random event after the capture of the city.
- The stratospheric communication station usually manages to accumulate an additional charge during the refueling / repair / rest period.
Each city meets us with just two buildings – Repair and Supply.
- Repairs – opens the repair menu and parts purchase, that is, it is also a store. To buy parts, drag the cursor to the bottom of the window and scroll down – an inventory of parts will appear.
- Supply – opens the fuel purchase menu, with which we are already familiar. Drag the mouse to the right – and the menu for buying ammunition will open
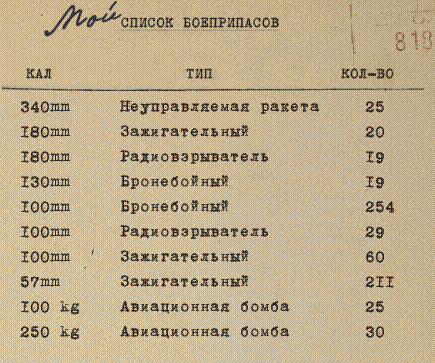
First, let's deal with the ammunition. A random set of ammunition is sold in each city – both in quantity and type. The smaller and more common the caliber – the more often it will be available. You can view the available shells by clicking on the list of ammunition – in the same place you can buy or sell by clicking, dragging the scale. The sold items will appear on the shelves immediately. You can buy them back from the shelves..
Equip ammo before the fight, only their presence in the list is important.
The repair menu is somewhat more complicated.. Firstly, repairs in the game are combined with construction – if you add something to the ship or remove – it will just change the project and start the renovation process.
Repair itself (restoration of strength of unbroken parts) – takes only time and does not require money but spare parts (they can be obtained by dismantling the corps of destroyed opponents). If the part was destroyed – it is bought in the store and installed, yet again, is free. Hence, if the store does not have the necessary spare parts – repairs will not be completed. Because of this, it makes sense to carry rare parts in the hold. – so as not to hope for random.
 Lightning lost its engine in battle, but there is no new one on sale. We'll have to wait until there is.
It also means that you can dismantle parts from some ships to put them on others for free. – very useful when there is no money or spare parts and you need to collect something ready for battle from a heap of broken ships.
Dismantling does not take time, unlike assembly – do not remove parts just like that.
All kinds of consumables in the form of missiles, rescue capsules, anti-missile – at startup “break” disappearing from the ship and can only be restored by repair, which again takes time and requires you to be in the city. Even if you have a stock of missiles in the hold – you will not be able to put them on a hike.
The chassis and engines are always repaired first. – everything else follows after them. It has to do with the landing mechanics. Ships can be repaired in the air, but landing them on a special site in the city gives an acceleration of repairs. In shipyards, this acceleration can reach 500+ percent. When landing, you need to land the device's legs on the ground at a speed of no more than -5 meters second – high speeds risk breaking the chassis and starting to destroy the ship. If you land on several sections at once with repair acceleration numbers – they will add up, this is useful for large ships.
Important – the repair cost counter does not include your spare parts. It always shows the absolute cost of the repair.. Do not be alarmed if re-equipping missiles that you already have draws you thousands of gold value. – your wallet will not be harmed, rockets will be taken from the hold.
Advice:
- Do not land immediately upon arrival – first go to the repair menu, estimate the costs and only then use the landing button. This will save you time and effort. – why land a ship that already has time to be repaired or cannot be repaired at all.
- If money is very tight – parts can be removed from auxiliary ships. Not only will it make you money, it will also reduce fuel costs by “plucked” ships. And after you have money – can be repaired according to the original design and the ship can be returned.
- If your ship needs repair and is unable to land (tore off the chassis or engines) – fix the chassis first (pulling the slider down so that only the necessary is repaired) and land – gain in time.
- Not a bad idea – have a small stock of rare parts for ships that often lose them in battle.
- Try to withdraw ships from combat before their parts begin to be destroyed. Repairing a battered to a bright red part is only worth time, and replacement – full cost.
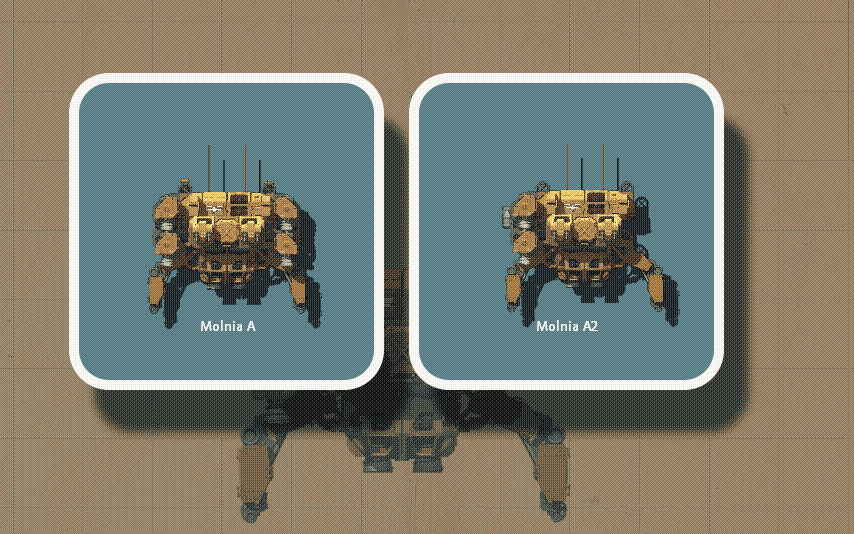
Rebuilding ships works through repairs – we just remove the unnecessary by picking up the details and right-click to send them to the hold. Then they can be put back from the hold – this will already be considered a repair and will take time. After we change anything about the base project – you need to save the new version to a separate project (by exiting the repair menu). Each ship keeps its projects with itself and you can choose when repairing – which project to use.
In order for the new version to be generally proposed to save – be sure to add something, if only to dismantle – project do not offer,
Engine removed from lightning and bomb added. A removed engine will not lead to a new project, and the added bomb – will lead.
Ship parts are stored in the hold. Dimensionless hold – if you check the maximum range of the same ship with and without weight unnecessary for flight – then he will fly further with the same details in the hold, rather than equipped on a ship.
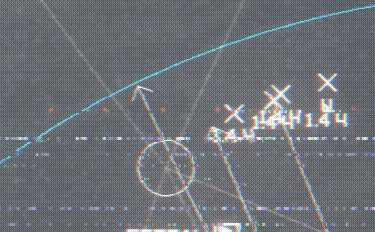
The crosses indicate the range “Waves” with means of detection, blue line – range with them, but in the hold
This allows you to safely carry around a small warehouse with spare parts., missiles of all sorts, etc..
Purchase and sale take place without extra charge, at the same time installed by you “from the store” things are immediately bought and put into the hold. If you fly away without completing the repair – details will remain in the hold, you don't need to buy them again.
Spare parts speed up repairs exactly twice, consumed quite quickly (?exact formula?). You can get them by dismantling the corps of destroyed enemies., you cannot buy separately, it's a pity.
Advice:
- You don't have to sell ships right away – leave the stub in the form of a bridge with a pair of engines. Then you can restore the ship or rebuild into the one that is more needed.
- It makes no sense to remove equipment to increase the range and acceleration of the ship – the time spent on repairs will be much more.
- Changing the type of missiles is also done through restructuring. – you need to remove the rocket and put a new one.
Basic detection method, available to every ship – it's visual. It is indicated by a yellow circle and is the same (?) for all. In most cases, this means that if you see an enemy – then he sees you and will soon raise the alarm. Exceptions are airplanes – they are small and fast, can spot the enemy and go unnoticed.
All detection methods except visual – have friendly fire and mark your groups / planes / missiles.
Radar – this is your primary long-range detection method. Its main disadvantage – he gives you out to everyone around you at twice the distance. This can be avoided by turning on the sector mode of operation. – then not everyone around you will see you, but only in a translucent cone. A circle appears around your ship on the map indicating the distance and sectors that will help you guess where the enemy is. In general, the radar should be turned on for a short time and then when you suspect that you are already being seen.
In ground mode, the radar can search for hidden cities.
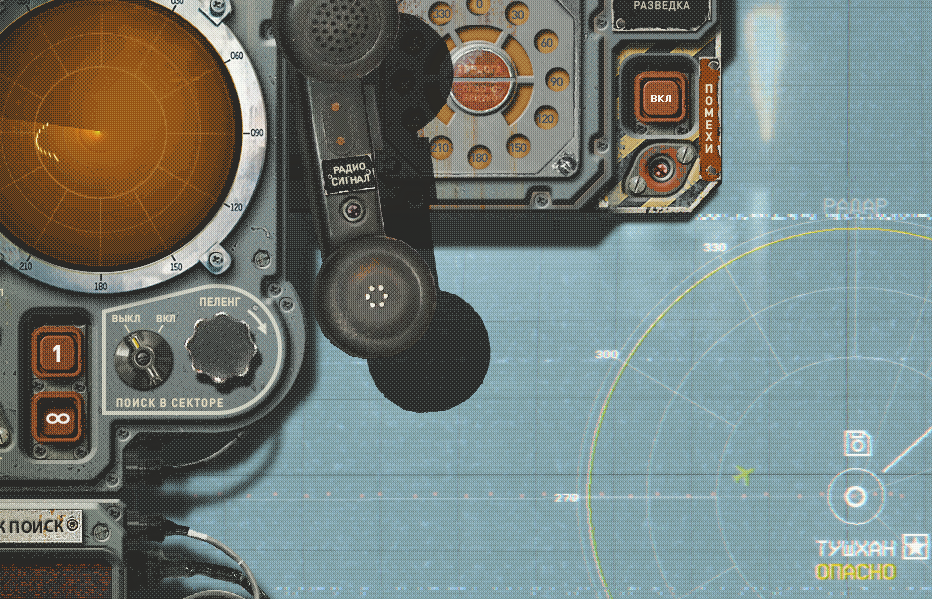
The radar detected its own aircraft in motion
RTR – this is your main method of understanding that there is someone large and hostile nearby. It picks up the radiation of enemy radars according to the same rules that enemies pick up your. The main plus – enemy strike groups are not particularly hiding and do not stop scanning the terrain. The accuracy of the RTR divisions depends on your RTR station and the strength of the enemy radar, but on average if RTR shows 2 division – you are not visible yet, 3 – slightly visible, 4 – the enemy is close. It is worth equipping even small strike groups with RTR – this opportunity is given for example “Wave”.
IR search – it is a vastly improved visual detection method. He gives you information in advance and does not disclose your position.. Its main screen shows the sectors where the signal is found., and the small screen shows the sector itself. The bigger the footprint on it, the more the thing flying towards you.
Interference – it is not an anti-detection method, and missile defense. Being included, they will reduce the guidance cones of conventional cruise missiles and illuminate you for RTR and radar-guided missiles.
Advice:
- Turn off the radar and put it in sector mode
- Use it when they already see you. – when the alarm is raised, you are spotted by the radar, etc..
- Use it when you want to be seen – a small ship with a radar can light up and lure the enemy into a volley of missiles into the void, yes, and your main fleet can be lit up – maneuver sharply.
- Prefer aerial patrols and reconnaissance teams.
- If you are spotted by radar – then the alarm is not raised immediately. The alarm will go up when you are visually detected. However, the strike group that spotted you will definitely try to catch you and throw missiles and planes at you.
By the strength of the signal, you can tell how far the enemy is., by bearing – Where is he located.
Typically, the message indicates:
- Call sign of addressee. Usually this is a city and if you understand which city they are referring to – you can record this callsign near the city for a better understanding of the situation.
- Callsign of the sender. It's almost always something flying and hostile. – convoy, strike group or something. Knowing the call sign of a specific enemy, you can see him in the message – understand where he is.
- Well. It is indicated very often, but not always. Convoys usually report their route, shock groups – just motion vector.
Occasionally you can find out:
- convoy cargo (does not affect trophies, because. we do not sell cargo, and the ship itself)
- location or end point of movement in coordinates
- what is needed at the point of arrival (not sure, but usually only shock or torpedo groups are requested at the point of arrival)
At some intervals, messages change the encryption key. You can get the desired key by searching the radio operator's cabin in the wreckage of enemy ships – one by one 4 component at a time.
Important!
You do not need know encryption key to use. You can safely turn the key at will, which means – it is not necessary to search every single cabin encountered.
Useful tricks for decrypting:
- Brute force. Drawing on the known parts of the key – just randomly turn the key until you understand what is written. Despite the theoretical complexity of 48 ^ 4 – much faster due to the fact that already with 2 the key component, you will begin to understand from the scraps of words what was meant.
- Throw out the numbers. The numbers are pretty rare in posts – and do not appear in callsigns at all. This cuts off quite a lot of key component values.
- Callsign selection. Frequent use of tropospheric communication stations reveals the call signs of opponents – knowing who was previously seen in the area, you can collect the callsign that will automatically select the correct key.
- Irreplaceable signs. The degree icon in coordinates is not changed by keys, as well as some special characters. By twisting the keys, you can understand which sign has not changed and what should be around it – for example, the coordinates include only the numbers corresponding to the coordinates in the area where the signal came from.
- Cities. Convoys often provide route names in a chain, which can be restored by selection in the same way as with the callsign.
- Number in message. If you have only one key component and it revealed a digit – then, with a high probability, you can pick up more components by restoring the original figure. Weight is almost always indicated in thousands of tons., coordinates coincide with the bearing vector, speed cannot be too low or too high, a lonely figure – it's hours before arrival.
Using these tricks, you can feel comfortable with only one key component and sometimes even without worrying about the radio operator's cabins at all..
You can draw on the strategic map using a ruler (draws a line, until the line is over – shows distance in kilometers), compass (draws a circle, you can mark dangerous areas and roughly determine the epicenter of the enemy radar by RTR) and pencil (label with inscription, very convenient to mark the habitats of enemies or allies, write down callsigns or simply indicate where the alarm was last raised).
- Garrison. Every city that we have not yet visited is guarded by a small group of ships.
- Convoy. Usually this is a lightly armed truck and several escort warships..
- Strike group. The main danger. Several cruisers armed with heavy weapons and cruise missiles. Has radars.
- Torpedo group. Weak in open combat, but carries much more missiles and fires them more actively. Appears later than shock groups (in relation to the distance covered to Khiva).
- Aircraft carrier group. Stronger than a torpedo group in open combat due to the ability to launch aircraft directly in combat, conducts air raids.
Garrisons are usually not very strong and represent the main source of experience and trophies.. Their strength is highly dependent on the distance traveled., and the ships themselves are constantly sitting on the ground in the city and do not use radars, thanks to which it is very easy to inflict a stealthy strike on them or strike with a bombardment. They will chase your fleeing ships if they spot you, but by themselves, they will not pull together to the place of alarm. When the alarm is raised, they hang in the air and you will not be able to attack them unnoticed.
Strike teams are very strong from the start. They move slowly in a random direction until an alarm is triggered.. In the event of an alarm, the nearest strike teams immediately change course and try to reach the place of alarm.. When moving, they prefer to move along the lines between cities, but leave these lines for pursuit. If they spot you on the radar – launch cruise missiles, therefore, without high-quality missile defense, it is better not to attack them head-on, and lure a salvo to the bait in the form of a small ship.
Torpedo groups are lightly armored, but not unarmed missile carriers. The danger is their volley – it is more massive and often carries anti-radar missiles. Show up late, do not come close to the place of alarm (?), instead, missiles are fired at the intended target.
Aircraft carrier groups – copy the behavior of torpedo groups, appear very late. Dangerous because interceptors with air-to-air missiles destroy like your aircraft, and your cruise missiles without serious losses on their part, which means – are seriously curtailing our arsenal.
Convoys – not very stable, but a good source of money. They can be detected by radiograms, using stratospheric communication stations, radar or patrols. They can ignore the lines between cities and very often enter the city a little off the expected vector. Noticing the player, they suddenly change course and raise the alarm, trying to fly to the nearest city and sit in it. Consists of a convoy of a prize ship that does not need to be destroyed (it will go to us) and several small ships. Escort ships are usually few in number, but the prize ship itself spits missiles and small air defense cannons, what gets on the attackers' nerves and interferes with maneuvering. Once captured, the prize ship will become part of the fleet (including providing the strike group with fuel). He has extremely low morale. – at any entry into battle, he will make legs, which means it is undesirable to get into battles. Upon entering the city, the ship will be automatically sold – it's about 10-20 thousand gold.
If an alarm is declared on the route of the convoy – he will change the route.
For every enemy ship destroyed, your ship's crew gains glory (experience). By increasing the levels of the crew, you get a choice of random 2-3 features from the set:
- +20% acceleration in battle. Very useful to everyone.
- +30% (?) reload speed. Very useful for attacking ships.
- +30% flight range on the strategic map (?). Very useful for all ships.
- +40% to the survival of the crew. I do not know the practical benefits.
- Resistance of the crew to overload. Hachimuchi in the team will start at much greater overloads than before. Useful for very fast ships.
- Full ammunition at launch. Very useful to everyone, since it will give more chances to shoot down an incoming missile or aircraft.
After 7 level to swing the ship is pointless (?).
If you get very confused – you can rebuild heavy ships and non-combat ships into light shock ships to level up experience and get very cool perks. But if you don't munch – it is easier to first install some 100mm barrel on a non-combat ship and knock down starting opponents – they are not very dangerous.
After a battle at the crash site of enemy ships, several trophies will be generated, the ability to pick up which is limited in time (term random). Trophies include:
- Weapons from the arsenal of destroyed ships, RLS, active protection systems. Bombs can explode, destroying yourself and a random trophy. Coins represent thousands of gold (price if sell)
- Ammunition (random by quantity and type). If not collect – explode, destroying a random trophy.
- Fuel – about 800-900 fuel. If not collect, explode. Will stay in the desert if he doesn't have time to fill up the tanks.
- Gifts for the Tarkhans – in crew cabins.
- Information about the tarhans – in the captain's cabin
- One of the components of the encryption key – in the radio operator's cabin
- Survivors – does not allow kindness to fall in the worldview. Sometimes generated like this, that no risk by the crew – you will not have time to save. Sometimes completely accidentally destroyed by an explosion of fuel or ammunition.
There can be two hazards when collecting:
– an exclamation mark means that if you do not have time to pick up this trophy – he will destroy with him some random (including the one you are already collecting).
– skull means you risk the crew when collecting – to avoid, take the time to put on protective suits
Advice:
- you can evade strike groups by scattering your group, AI can't share, and the group is moving slowly
- The prize ship shares fuel with the capturing fleet., so do not hesitate to catch up with him even with the last drops of fuel.
- Torpedo groups are not defenseless, especially if they are covered by the garrison.
If your stealth attack fails and you are exposed – the alarm is raised. All garrisons are lifted into the air and put on alert, and to the place where you were noticed – put a label (red flag) to which the strike teams begin to strive. Duration of alarm – 12 hours (6 in case your planes are seen). After the end of the alarm, the label is removed, but the courses of strike groups and convoys do not change back. In addition to the obvious danger of sitting still, this makes it possible to arrange bait for the strike teams. – aircraft or small strike group illuminate in front of the garrison and leave the area, and the enemy strike group is slowly dragging to the place of alarm.
The main danger of anxiety and being noticed – this is a missile strike from a strike group or torpedo group. To avoid them – you can either change course abruptly, either turn on interference (will not help against missiles against radar), or split the group, leading the fattest ship forward.
Regardless of the outcome of any battle (except for repelling missile and air strikes) reduces morale of all participating ships even if they were not in battle. Replaying the battle counts as a new entry into the battle., so maybe no more 8 replays. Morality is less 3 leads to riot and ship desertion – do not lead to this. You can raise morale:
- Rest in the city – the crew rests regardless of what you do in the city. The percentage of morale point accumulated from rest persists, so any delay is at least partially, but will improve morale.
- Events and the help of the tarhans
- With remarks in conversations corresponding to the mood of the fleet (indicated by a raised finger)
The only stable source – this is a rest.
Advice:
- Use the fastest possible groups to attack cities. It will make it easier as a sneak strike, and leaving the city after the capture.
- Aircraft are very hard to see to enemies, but they cannot be secretly attacked – even if the air strike is successful, the city will announce the alarm.
- With morality 4 do not overplay unless you lost your ship.
- With morality 3 don't overdo it at all. It is better to get one damaged ship from the whole group than to lose the whole group due to desertion.
When an enemy strike or torpedo group spots you – she empties her rocket arsenal at your coordinates. Missiles have their own small detection cone – if the enemy falls into a cone – they will start to twist to catch up. Rockets are not very picky about the enemy, the plane is also a suitable target – be careful. When colliding with a target (you) – the battle screen will open and a rocket will fly out of the edge of the map at high speed. You can shoot down a rocket with any weapon – theoretically even an aerial bomb – but she has quite a lot of health, and the speed is very high. Dodging a rocket is real too, but because of this it will not disappear from the map.
Our missiles are absolutely similar to the enemy – on the launchpad, you can select how much and what to launch, Mark (similar to the selection of the shock group in a way) which way to release them and press the Big Red button. You can run everything at a time. 4 rockets – but this limitation is bogus. No matter how many missiles we launch – they will fly out one by one, evenly spaced, and the total number of missiles is equal to, how many missiles are placed on your ships.
During tactical combat, you gain control of only one ship. – usually the biggest. The rest of the ships are controlled by the AI and are trying to shoot down the rocket, aiming at her with all available artillery. The best way to deal with missiles when they have already reached your fleet – rocket launch R9 Sprint. It cannot be launched on the strategic map. – and in a tactical battle it is started by the button “FROM”. Its power is almost always enough to destroy a rocket., but for guaranteed destruction, it is advisable to release them in pairs. Once launched, it will target the missile. – but on the way it can hit your ships or be destroyed by anti-aircraft fire. Also, AI-controlled ships in your fleet will automatically launch P9 missiles., so if you notice a launch from an allied ship – no need to waste your launch.
Missiles can carry a nuclear warhead – then her explosion will be so strong, that even if you knock her down – your fleet will be seriously damaged. It is highly undesirable to allow such missiles to come into contact with the fleet.. Good news – the enemy will not use them until you use nuclear weapons yourself or reach Khiva.
Airplanes are more convenient and versatile tools.. With a not very big difference in cost, they have much more functions. – they can be used for scouting, Attack, shoot down missiles, raise the alarm.
The aircraft requires a landing deck on which it will be placed. Destroyed aircraft are replenished in the same way as missiles – through renovation. Departure plane disappears from the deck – he will not be in battle. If there are aircraft on deck – they can be launched directly in battle, but you won't be able to choose the armament of the aircraft.
You can launch the plane by opening the aviation panel, hovering over the aircraft type of interest and selecting from the drop-down list – armament for this aircraft. Weapons can be combined, as well as types of aircraft – do not hesitate to cover your bombers with interceptors. By default, only a cut-down copy of the 37-mm cannon from the ship is available. Its benefits are extremely doubtful., aircraft do not know how to accumulate a salvo and are greatly inferior in strength to ships. The rest of the weapons will have to be bought for money.
The departed air group can be controlled in the same way as the fleet. They do not know how to land on the ground and when the fuel runs out they return to the aircraft carrier, and having reached the point – start to fly in circles. After returning, the planes will become unavailable for a while. – will refuel. Faced with the enemy, the planes will launch an air raid – they will appear in waves from the edge of the screen, dive at enemies and upon exhaustion of ammunition – leave. If it smells like kerosene – you can press the retreat button and stop the attack.
Aircraft are very poorly visible visually and can approach enemies very close while remaining unnoticed. Thus, you can be aware of the location of opponents without launching the radar.. When moving in a dangerous area, you can launch a reconnaissance aircraft in front of you or send it to the area of the enemy's radar to find out exactly where the enemy is. Remember, that aircraft can destroy an enemy garrison with a surprise attack, but it will still raise the alarm, albeit short.
There are two types of aircraft available – attack aircraft and interceptor. Stormtrooper cheaper, takes up less space on deck, but also carries much less weapons, and for the rest of the characteristics it is much worse. It is desirable to have both types of aircraft in the fleet. – stormtroopers are scouting, take on weak opponents and lure out anti-aircraft missiles if the target needs to be covered at any cost. Interceptors destroy missiles and enemy aircraft and cover strong opponents.
When buying ammunition, you may notice several types of bombs and missiles that are not suitable for any weapon. It's all – aircraft armament, and the aircraft carriers themselves will not stand out as “suitable” ships. The assortment includes aerial bombs (smaller and larger), unguided rockets (smaller and larger) and guided missiles (expensive and very cool). Bombs are great for attacking hulking targets like cruisers or for unexpected raids on a seated enemy, unguided missiles will reduce the risk of being hit by anti-aircraft fire and guided missiles are ideal for intercepting missiles and enemy aircraft. Better to have a small stock of each type of ammunition in your arsenal.
Advice:
- An aircraft carrier in a group is very useful at any stage of the game, even if used exclusively for reconnaissance..
- The flagship – a good candidate to place at least a couple of planes on it.
- An airplane can not only detect a missile, but also take her away from the fleet
- Enemy airstrikes are very dangerous, try to meet them with your aircraft or at least with ships taken into the air.
- Missile carriers are not very useful at the start of the game, but when you are strong enough to attack strike teams and build up a supply of missiles – you can buy a couple of pieces or rebuild from other ships.
- By the end of the game, the missile carriers will come in very handy, fortunately, they are often found in reinforcements of allies before the final battle.
- The flagship – good candidate for carrying a couple of X-15 and A-100 missiles. Sevastopol unfortunately carries nuclear missiles – it is better not to use them until you are ready to repel nuclear attacks.
- If you use aviation – be sure to immediately check in the starting city for the presence of advanced aircraft weapons.
- It's useful to store more than rockets, but also planes – they are only sold in rare parts markets. A couple of each type in the hold will never be superfluous.
- Don't underestimate light and fast air defense ships. You can separate them from the group and send them towards the rocket.. Even if it didn't work out to bring it down – a light ship can just dodge.
- Do not place missile defense on the bottom of the ship – then, when trying to launch from the ground, they will collide with the ground and damage the bottom of the ship. The same goes for the superstructure – she may be in the path of the rocket.
Tarkhan – this is the local field commander, has a ship at its disposal, conceit and connections with sub-factions. From the fact that Tarkhan becomes our ally, we get the following buns:
- Ship (random, but always moderately strong). Is free.
- A small amount of money (the more we endeared Tarkhan to ourselves – the more will get). If Tarkhanu you didn't like – he will take the same amount of money from you.
- The ability, if something happens, to exchange the attitude of the tarhan for his instant help.
- Allies from their faction in the final battle
- Sometimes – habitat of another Tarkhan.
You can find them by receiving a tip from another Tarkhan or by searching the captain's cabin (trophies) for letters with leads. Well, just combing the cities. If you land and see a ship in a city that is not a mercenary camp – this is Tarkhan.
Important – letters from the captains' cabins are not marked in any way and disappear after closing. Do not be lazy to immediately draw a circle or marks in the area of the alleged habitat of the tarkhan.
Find the spread – half the battle. Now he needs to be persuaded, at the same time, we can control the course of the conversation rather limitedly. The conversation is a simple card game – we are given cards with topics of conversation, which are issued anew after each move. The number and the topics themselves vary greatly and are aimed at different spiritual qualities of the interlocutor.. In total for a conversation, you can say 5 things, but gifts and a series of successful speeches will increase the length of the conversation.
Tarkhan's personality traits are initially hidden, but at the same time they do not change from try to try. In addition, they are usually strongly attached to their occupation and background. – being determines consciousness. The military and pirates are more prone to cruelty, are not afraid of you. Pirates respect wealth, do not respect justice. More conservative and traditional tarhans tend to be faithful.
One of the features can be recognized during the event when meeting – welcoming Tarkhan. This will also lay his basic attitude..
When Tarkhan likes or dislikes the topic of conversation (coincides with his features) – the player gets so many points, how strong is this trait. If he hates violence – he will like the speech about ending the war on +2, if peaceful – +1, if he doesn't care – 0, if severe – the ratio will go down by 1, if bloodthirsty – on -2.
Regardless of the outcome of your speech – this topic becomes irrelevant and receives a penalty in -1 to effect. You can use it again, but the fine accumulates and even the Tarkhan who loves this topic will start to get tired and his attitude will fall.
If you are talking for the second turn in a row on topics that Tarkhan likes – he will be heard and you will receive a bonus “good speech”. It disappears if you stop making coups.. Initially, the effect is +1 extra point, subsequent coups will increase the bonus and give extra moves.
In addition to chatting, tarhans can be given gifts. They are obtained from the cabins of destroyed enemies and are “malnourished” things, that is, they have no penalty for consistent use. In addition, they are not generated randomly and give an additional turn.,(but they are worth a move). If you realized that the Tarkhan loves the people of Herat and there are several banners lying around in your warehouse – you can donate them in bulk and not take risks with speeches.
Each tarkhan has its own item in the communication menu (intercom button). You can exchange a relationship unit for a bonus from the list:
- Raise the morale of the fleet – gives a lot (5) had to for once
- Speed up repairs – greatly speeds up repairs
- Reinforcements – a random ship will join you
- Money – will give about 10000
- Intelligence – will give right away 7 reconnaissance points similar to stratospheric communications
Despite the fact that the bonuses are very tasty – you need to use them only in a critical situation, because. it is no longer possible to raise the attitude of Tarkhan after a conversation, and help in the final battle will be very useful.
Advice:
- Keep a few gifts in stock – the conversation without them is very random.
- Very rarely, the tarhan does not fly away after a conversation and gives you a chance for revenge. I only had one time, maybe it's a bug.
- Do not spam gifts immediately if you see a chance to use speech with unknown or positive effect – the next round can be merciless.
- The first tarhan will get you for free – just give him the ointment right away. But if you have a supply of gifts, better to persuade him – then instead of +2 you can dial +4 relations.
Game restrictions and battle conditions:
- At the very bottom of the battle is the ground, the relief of which is random. Colliding with her is similar to colliding in landing mode., except that the chassis is not released and damage will be necessary.
- The edges of the battlefield that are not land – just stop the ships rested on them. Pushing enemies to the edge of the battlefield is very helpful – this limits the ability to maneuver.
- A retreat zone is located at one of the edges of the battlefield. – if you take your ship there, it will safely exit the battle. Usually the retreat zone is on the opposite side of the point where the ship spawned. For each ship, the retreat zone is regenerated.
- Your ships spawn at a random point as far away from enemy ships as possible.
- After the ship leaves the battle, all homing missiles aimed at it will lose their target and fly by inertia.
- Only one of your ships participates in the battle and no more 3 (4?) enemy ships. If there are more enemy ships, they will enter the battle after you destroy the enemy ship in turn.
- A ship that has retreated cannot be returned to battle, when all your ships retreat or are destroyed – defeat will be counted.
- If you catch enemies by surprise, they will be on the ground and rise into the air through 10-15 seconds.
- Enemies always attack with volleys, before firing, they will show the direction of the firing.
- After destroying an enemy, your screen will darken and the victory screen will appear.. The screen also darkens from overloads, so be careful.
Artillery begins by placing turrets with the desired type of weapon on your ship. Towers consume electricity from generators and require active ammo racks (not near). The direction of the gun turrets will change focusing on the guidance line (which follows the cursor). The rotation speed of the towers is fixed and not instantaneous, so watch out for the turn indicators (small arrows next to the ship). Towers rise above the body, but not very much – you can place armor in front of them, but huge fuel tanks will block the firing sector. Fortunately, guns will not shoot at the tanks – if the target is covered by a part of the ship, then the shot will not occur.
Remember that towers need energy and ammo racks, if your ship's generators or ammo racks have been destroyed – towers will become useless. Moreover, the ammo racks are highly explosive and a small ship can be destroyed by an explosion. Do not place the bridge close to the ammo racks if you have another place for it.
Cannons placed on your ship are tracked independently, if one could not shoot due to overlapping view, then the charges loaded into it will not be lost. As soon as the cannon can fire – everything accumulated will go into a volley. Each gun turret accumulates projectiles individually, but the command to shoot them arrives at the same time, ie. fire all guns at the same time.
Rate of fire data for most guns applies to each barrel in the turret. So 180mm-1 gun is similar to 180mm-Sarmat, but gives less shots per second, because. u sarmata 2 towers. 180mm-squall due to the presence 6 barrels shoots almost continuously.
Each gun turret accumulates a certain number of shells ready to fire. (the number is written in the characteristics of the gun). They can be released in one gulp at the same time., which is useful for a sharp reduction in distance.
All artillery shells have inertia and gravity – so that the shells do not fly out clearly along the guidance line. This is important to consider in battle and especially – in long-range shootouts.
Artillery is conventionally divided into two groups in battle – main and auxiliary. To the subsidiary group (the fire is on the PKM) all guns of the smallest caliber available on the ship fall (an exception – 220mm MLRS, it is considered auxiliary if there is a 180 mm caliber). All others are considered the main group and are controlled by paintwork. This division is useful because you can save projectiles., shooting small targets (like rockets) from auxiliary caliber and on large – from the main. The aiming is not separate. – all guns turn to the aiming line, so it is possible to fire simultaneously at different targets only if your main caliber is slow and does not have time to turn behind the auxiliary.
All projectiles in the game have friendly fire and can destroy other projectiles, which means that dense barrage of small caliber fire can protect you from enemy shells. In addition, enemies sometimes fall under their own volleys and missiles..
Types of guns:
- 37mm. Very high rate of fire, creates a very dense cloud of bullets, which is ideal for an auxiliary anti-aircraft caliber. If you have to shoot at the enemy – better to load incendiary cartridges. Damages armor very slightly.
- 57mm. Very high rate of fire, but slow relatively 37mm reload, which makes the fire cloud shorter, but the damage done is higher. Penetrates armor poorly.
- 100mm. Universal tool, recharges quite quickly, accumulates 4 shot, can penetrate armor or shoot down a heavy artillery shell.
- 130mm. Accumulates for 1 shot less than 100mm gun, but it penetrates armor much better.
- 180mm – 1. Can't fire volleys, requires 2 ammo rack instead of one. Charges slowly. The shells hit hard and pierce armor well, but relative to the 130mm cannon, the total damage is lower. Although it can be used to destroy large ships at long range – it's better to add ammo racks and install something more powerful.
- 180mm – Sarmat. Accumulates 2 shot, fires pretty fast. Requires 4 ammunition, but takes up less space and energy than 2 180mm-1.
- 180mm – Squall. Monstrously expensive and heavy gun turret. It's very hard to get her onto the ship, but its rate of fire, volley capacity and reload speed are amazing. For a volley, this battery does not 6 but 8 shells – 2 manage to get to the store before it is completely empty. Requires 12 ammunition. However, 2-3 Sarmat may be preferable due to the density of the salvo.
- 220mm – RSZO. Instead of projectiles, it fires rockets that accelerate forward. Missiles uncontrolled, so they differ from shells only in damage and good armor-piercing. MLRS turn speed low, so theoretically it can cover the area by rotating the guidance line.
Each gun has additional purchased ammo, which improve the attacking characteristics of the weapon. This ammo is equipped before combat during the deployment phase.. Only one additional type of ammunition can be equipped at a time, they switch with the R button. If you have ammo available but not selected for loading – the red indicator above the ammo rack will light up. Changing the type of ammunition resets the magazine.
Ammunition types:
- Incendiary. Hits cause fires on an enemy ship (slowly destroy fuel and damage parts). Quite cheap.
- Armor-piercing. Penetrates armor harder, fly much faster, look “thinner”. Can damage parts behind armor.
- With radio blast. Explode when there is a target in front of them or they have flown some (about a third of the screen) distance. The exploded projectile releases shrapnel, which have low armor penetration, but very badly damage parts and the body. Very dangerous at close range – makes it impossible to dodge due to a large area of effect.
- Adjustable. Fly in a sine wave, slowly gaining amplitude, due to which they have a better chance of hitting a large target. Useless for short distances – do not have time to gain amplitude. Do not affect damage and are very expensive.
Enemies can also have special ammo. They are used randomly instead of the normal salvo. – then the aiming bars of the enemies change to blue. Enemies do not respect the restrictions on one type of special ammunition (?). After several consecutive volleys of special projectiles – often follows switching to a series of salvoes with conventional shells.
Advice:
- Try to shoot from all available guns in the editor and get used to the flight of shells.
- Try to accumulate a small supply of special ammunition – at least by 4-5 full clips for each caliber of your ships.
- Don't waste all the shells of your auxiliary artillery on attacking the enemy – AI is not inclined to fire all missiles at once. Leave a little just in case.
- Practice shooting down artillery shells. If you start defensive fire at the same time as an enemy salvo – there is a high chance that nothing will reach you.
- Do not place implements close to large tanks, try to provide your gun turrets with a maximum and overlapping sector of fire. If you like the ship, but his guns are poorly located – take the time to rearrange.
- If enemies are heavily armored, and you have only one ship capable of piercing armor and a lot of small items armed with a small caliber – you can purposefully make several breaks in the armor of each enemy ship. This will allow the use of smaller ships., and not drag out the battle with one heavily armed.
The first thing that ideally should meet the projectile – this is armor. Armor plates weigh a lot (what can in principle be tolerated) and block the possibility of functioning for everything that is not raised above the level of armor (which is already very unpleasant). Main engines cannot function (namely, they give the most power for raising armor), radars, rescue capsules, rockets, aviation, active protection complexes. Moreover, the armor has no wiring, which means that active protection complexes can be placed on the armored parts of the hull, engines and stuff – you will have to make a hole in the armor or install an external generator (Yes, there is no need to supply fuel to the generator, perhaps the generator contains a tank inside itself).
Due to restrictions, you will almost never make death bricks., whose armor covers 100% perimeter. Watch out for enemies and don't let them approach vulnerable spots. Standard ships often have huge gaps in the armor at the top and bottom of the ship.. Enemies always use ships from their set, so enemies will always have holes in their armor.
Armor has a high safety margin and deducts quite a lot of damage from hits – the smaller the caliber, the more damage will be absorbed (exact formula?). 37-mm guns can cut several modules and pieces of hull with a cloud of bullets, but they barely scratch the armor.
A projectile that hits you or the enemy deals damage to those parts, which had to hit. This means that it makes sense to look at the diagram of the enemy ship. (displayed on the right in the corner) and find vulnerabilities – they, where there is no armor.
After destruction, the part or part of the body disappears. If this disconnects any part of the ship from the bridge – she is also considered destroyed and falls. Projectiles hitting parts and destroying them also cause some specific effects – the ammo rack may not just be destroyed, but detonate and damage surrounding parts. Hits on the cabins kill the crew, on missiles – run the risk of detonating the warhead, on the tanks – cause a fire. The bridge, when destroyed, leads to the instant death of the ship. Loss of shunting motors can result in loss of control (also instant death). Loss of engines altogether leads to loss of thrust. De-energized due to the loss of generators, the ship first shuts down all systems in favor of the engines, and if there are no generators left – the engines also turn off and the ship loses control. Many enemy ships have a bridge sticking out from above and not covered in any way, which means they can be destroyed very quickly.
Frame (unarmored sections of beams without parts) also takes damage and can protect the area behind itself from hits, but not in myself. If the body that connected the energy consumer and the generator is destroyed, then the consumer part will be disconnected.
Advice:
- Take a closer look at the schemes of the ships. If he has a bridge sticking out or a lot of missiles next to each other – it is a candidate for instant death on the first shot.
- Try not to let enemies fly under you. Most ships have propulsion engines that can only look down., and the loss of maneuverability in battle will not lead to anything good.
- If the armor from one of the sides is broken – try to fly to the other side of the field. Especially important for heavy ships that do not have the ability to actively maneuver..
- No matter how big the enemy ship is – when the bridge is destroyed, it will die. Try to focus the fire on it., good big ships are very slow.
- Disabling sustainer engines is possible even with small calibers. If there is a battle of large ships – small ships can knock out cruising engines and significantly slow down enemies.
- If you fell into the hands of a ship with an unarmored top (but with armored sides) – add at least a little armor in the center (over the bridge if the bridge is not protected). This will add a bit of bomb survivability..
Engines are used for maneuvering. Marching can only pull you up, shunting – in any direction. Gravity pulls us down. Each engine has its own thrust vector, which applies in the direction indicated by WASD (be careful, if you have engines on one side and on the other – no or their cravings are low – will spin you up). The speeds in the game are calculated fairly fairly., so there is no need to wait for an instant reaction to a change in direction – first need to overcome inertia. Engines consume fuel, but not very fast. Destroying fuel tanks reduces the amount of available fuel as a percentage of the total.
The overall maneuverability of your ship is determined by the thrust-to-weight ratio – the relationship between pulling force and weight. The higher it is – the faster you pick up speed.
The main purpose of the main engines – countering gravity and releasing thrusters. They only turn on then, when their thrust helps to change the motion vector – ie. they will work during takeoff, while decreasing – will be turned off. When moving to the side, they will simply maintain your height., turning on just enough so that gravity does not bother you. If you are somehow turned upside down – cruise engines will work, helping your current motion vector.
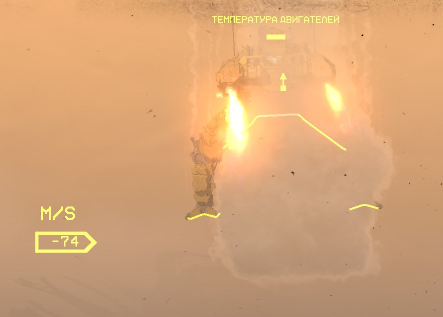
Your engines can run in afterburner mode (shift). This triples (?) thrust your engines and heats them. When the heat reaches its maximum – the engines will turn off, so don't overdo it. AI does not take into account such drastic changes in thrust, so if the enemy starts shooting, then the afterburner will help you dodge. Fires and normal work also increase engine temperatures.. The fire can be extinguished using the fire extinguishing module and button B – one module extinguishes one fire.
The main type of maneuver worth mastering – this is an abrupt change in the motion vector. It is advisable to do this under the afterburner. – then the chance that the enemy salvo will miss is very high. AI always takes a lead based on your current speed and motion vector, so that he can be fooled even by simply hovering in place and twitching sharply during a volley.
When you change your motion vector – overloads begin, which are presented as screen blackouts and crew sighs. Moreover, even if the screen is black – you will see frames outlining enemy ships and shells. If there are a lot of effects on the screen – overloads even help clarity of understanding. No other overload effects (?). Overload can be confused with victorious blackout if you ignore the sounds.
Bombs – these are independently falling and very painfully exploding analogs of rockets. They can only hit targets that are slow or on the ground., but their price / damage ratio is incredibly steep. Hovering occurs by the middle mouse button. The bomb can be destroyed in the air or directly on the ship – it is suspended from the outside. The bomb is gaining speed slowly, so there is a lot of time to dodge – if only the speed of the ship is enough.
Missiles will be discussed in this section since they will most often have to be deceived by maneuvers. – they are aiming at our ship, because of which the distance does not affect the reaction time in any way. There is only one type of rockets (two if we count a rare species inaccessible in the editor “nadir” – however, it differs only in damage). The rocket flies at you with its own engine, who is not very good at reversals, so the easiest way to dodge – just accelerate into the zone behind it. A sharp change in the vector of movement or luring the enemy into the trajectory of the rocket can also help..
In addition to dodging and destroying a rocket with artillery, the arsenal of missile defense methods has active protection, presented by two modules.
Heat traps – this is an inexpensive method of protection based on the provision of a missile to a false target. They shoot back at the F button – all available on the ship at once. For the rocket to take on a new target – you need the launched trap to be closer to the rocket than your ship, so it is not always possible to do with one launcher. Heat trap missile – flies through it and if there are no other targets – flies off the edge of the screen.
Active protection complex – it is a little more expensive, but a more functional module. He creates a zone of low damage in his sector of defeat as soon as something hostile and small is in it.. Damage is not very powerful – not always one KAZ can cope with a missile. But this damage zone can shoot enemy shells of large caliber, reducing damage to your ship. The module has a recharge, so there will be a period of vulnerability between uses. (There is a limitation on the margin of operations?) Very good idea – put them in pairs or use them instead of armor on very light unarmored ships. KAZs are sold only in the markets for rare spare parts.
Advice:
- Practice piloting ships with different thrust-to-weight ratio
- If several ships shoot at you, and you are flying and you need to dodge urgently – just try to brake sharply. Most of the time this will work..
- Enemies can hurt each other. Try to keep one opponent between yourself and the rest – then there is a high chance that your maneuvers will lead to friendly fire on it.
For construction, in addition to a blank sheet, templates of all ships you open for the starting fleet are available. Careful with the restructuring “prize money” ships – by mistake they are also added to the starting fleet templates, but when added, they will be sold in the first city. You cannot build a flagship without editing the template file – here's how to get around it.
The building itself – creative process, you can create anything, at least a cube of death, at least an Emperor-class battleship from Warhammer. Therefore, there will be no specific recipes for success., but I will consider some things worth paying attention to.
The flight of ships out of combat is calculated somewhat differently and for high speed cruise engines are very important. – then shunting will give 100% time and thrust in the direction of travel. If your ship has a monstrously low range at high speed and thrust-to-weight ratio – this is because he has few main engines and more voracious shunting engines struggle with gravity most of the time.
For large ships, it is important to book in the center at the top and at the edges. – due to strategic missiles and air strikes.
Large tanks are not required for heavy ships, you can install regular tanks as well. This will reduce the overall fuel supply and the survivability of the tanks., but also removes the overlap of the firing sectors.
Many parts can be put on “oblique” body parts. There is no benefit in weight., not for the price.
Many missiles, radars and propulsion engines there is a need for no overlap by other units. Radars are more tolerant of this. – they can be partially overlapped. Much less tolerant of missiles – even if the departure cone is not blocked, there is a great chance that the rocket is aiming – will hit some of the elements of the case. Do not place missile defense missiles on the bottom of the ship, although it is convenient (the top is most often occupied by the superstructure and runway) – if you are caught on the ground, the rocket will hit you on the bottom.
Theoretically, the chassis can not be installed on the ship., saving a little weight and energy. It will make it impossible (if your ship is not very well controlled or heavy) landing to speed up repairs, but will not interfere with anything else. Chassis need not be powered – if there is not enough energy, then in battle it will be de-energized first, and upon landing it will be powered by any. The larger the chassis and the wider the area it rests on – the more weight and landing speed it will withstand.
 This frog-like ship is able to land without even slowing down. – it will simply lose the lower section of the chassis. Without damage, he is able to land at a speed of 30m / s
Despite the fact that the specialization of ships – it is very comfortable, sometimes it makes sense to add a little more strategically useful details – So, a tanker on which a platform for one aircraft is attached – also gives intelligence. Example – base tanker “Wave”, which provides a means of detection for small groups.
If you need a scout radar – it is better to use a radar than a small radar, insofar as 100 km won't do much good, but the ability to add missile defense – very nice. And it costs less.
Even a large tanker without a target of combat use needs at least some kind of air defense. A pair of 37-mm cannons will prevent planes from escaping with impunity and try to destroy flying missiles.
Rescue capsules do not need to be filled in full, but at least 25% it is desirable to have.
Fire protection systems – a good option for armored parts that will absorb damage without dangerous consequences (like an explosion of an ammunition rack or a fire).
Lightning – you can remove empty rocket racks and strengthen the hull, and a couple of added KAZ will greatly increase the survival rate.
Wave – almost perfect, the rescue capsule can be folded down so that it does not block the infrared vision. Shoving a runway is very hard, but probably.
Petrel – you can slightly unload the armor around the edges and add to the top, putting the escape pods down. It is better to add KAZs later., at first everything is fine without them. One KAZ on the protection of engines from below will not interfere.
Fennec – almost perfect, you can add more missile defense. Closer to the middle of the game, a layer of armor or KAZ will not interfere, but at the start it is too redundant and expensive.
Jaguar – disgustingly located bridge, you need to transfer it and book the top.
Gladiator – brute force with heat traps, you can remove them and add something to protect the engines.
Anger – armor will pay off towards the end of the game, but at the start it is better to have a couple of additional missiles and save on armor.
Sevastopol – very stupidly assembled, it is better not to use nuclear missiles, no aviation, a bunch of missiles for tactical combat, tanks very much overlap the sectors of fire and half of the guns will always be silent. The radars are stupidly located, there is not a single KAZ. You can improve the combat characteristics by reducing the tanks (or replacing them with small) and removing strategic tools, you can improve the strategic characteristics by adding aircraft and more missile defense. You can just make it more versatile, replacing nuclear missiles with conventional, concentrating the guns in the area with the maximum sector of fire and replacing tactical missiles with aviation.
Nomad – slightly better assembled than Sevastopol, but also suffers from a bunch of tactical missiles, which take up a ton of space (could there be aviation). By raising the cannons and lowering the tanks, you can achieve a tolerable firing sector.
Archangel – very armored ship with good guns. There are several holes in the armor, you can tighten them better and protect the engines with KAZ. You don't even need to optimize your tanks – just raise the cannons closer to the top and get a great firing sector.
Paladin – a huge battery of tactical missiles in the open air very badly contributes to survivability. Try to blow them apart so that one missile silo is covered by two pieces of armor. In the end, it is better to have less ammo than to catch the detonation of an entire rocket battery..
Navarin – piece of junk. If you decide to refine it anyway – then try adding armor, remove unprotected missiles and add some kind of barrel larger than 57mm. Chances are very high that you will end up with an Improved Petrel.
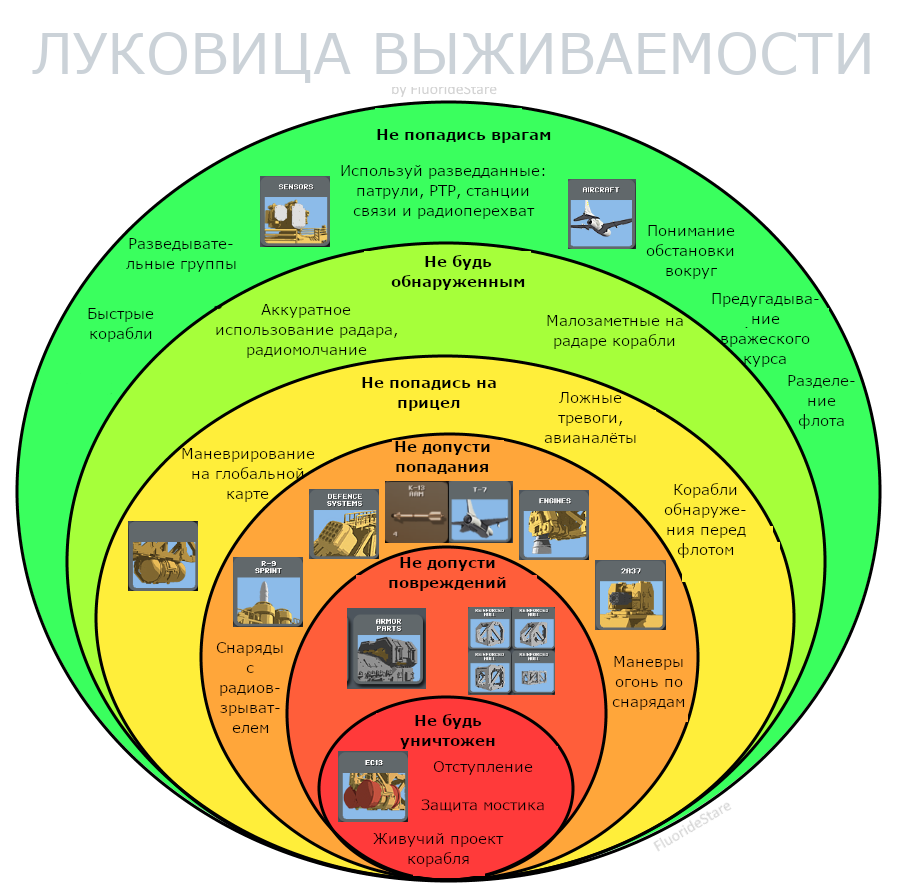
This bulb provides insight into how to ensure the survival of your fleet..
The main objective of the game – walk to Khiva, along the way, gaining more allies, money, weapons and preferably – scouting and clearing the entire area around Khiva to facilitate the final battle. For this we need to use several (you can start with 1 or even 2) independent strike groups and one main fleet to consolidate progress, knocking out strike groups and accumulating strategic ships, which will come in handy later. Use your own skill and light strike ships to capture cities and convoys with minimal investment, collect valuable trophies. Use the collected items to strengthen the existing groups. (ideally, each group should have a light support cruiser, small aircraft carrier, small tanker, attack corvette and strategic missile carrier). Drain all unsuitable or redundant ships into the main fleet – there numerical superiority and an extensive arsenal of weapons will be in the subject.
Use airstrikes to raise the alarm to manipulate shock and torpedo teams. It's important not just to dodge shock groups, but hunts them and impose battles on them on their own terms. Locate strike teams with RTR and air patrols. Lure them to places convenient for you with the help of alarms. Make them fire rockets at a small group that will easily escape from the attack. Shoot them with rockets and bombs (first missiles so that they spend the P9 missile defense, the rocket is cheaper and stronger). Then finish off.
Try to visit all possible cities – this and trophies from the garrisons, and bonuses of the cities themselves, and the opportunity to find tarkhan.
Related Posts:
- HighFleet: SCANNERS and how to work with them
- HighFleet: Starting ships and what they are eaten with
- HighFleet: Hidden cities, or why do we need a ground-based radar mode
- HighFleet: How saves work in the game
Leave a Reply